Starlink V5 Roof & Wall Mount with 360° Swivel Base
15%OFF
US$59+18%OFF
US$159+20%OFF
US$299+

안녕하세요,
2 영업일 이내에 답변을 받지 못하셨다면, 지연에 대해 진심으로 사과드립니다.
더 빠른 답변을 원하시면 WhatsApp (+1 (626) 412-7352 , +86 191 2063 1131 또는 +86 190 2201 1181) 으로 문의해 주세요. 위 번호로 직접 문자 메시지를 보내주셔도 됩니다.
귀하의 인내와 이해에 감사드립니다!
귀찮으시다면, "Tesstudio 공식 설치 서비스"를 위해 남부 캘리포니아 공식 매장을 방문하세요. 저희 전문가가 귀하의 Tesla 액세서리를 완벽하게 설치해 드립니다.
주소:
14761 Franklin Ave unit G, Tustin, CA 92780, 미국
친절히 알려드립니다: 저희는 제품 판매를 전문으로 하며, 전문가에게 설치를 의뢰하실 것을 권장합니다. 부적절한 설치로 인해 발생한 문제는 애프터서비스에 포함되지 않습니다. 양해해 주셔서 감사합니다.
1년 보증을 제공합니다. (인적 손상이 아닌 제품 문제에 대해서는 1년간 애프터 서비스를 제공합니다.)
모든 주문은 FedEx, USPS, UPS, SF Express 등 신뢰할 수 있는 운송업체를 통해 배송됩니다.
모든 주문에 무료 배송 혜택을 누리세요! 재고가 있는 상품은 1~2 영업일 이내에 처리 및 발송되며, 미국 국내 배송은 일반적으로 2~9 영업일이 소요됩니다.
사전 주문 상품이나 일시적으로 품절된 상품의 경우, 배송은 상품 페이지에 제공된 기간에 따라 진행됩니다.
옵션 선택
Tesstudio Starlink V5 Roof & Wall Mount with 360° Swivel Base
Mount your Starlink V5 higher and cleaner on a roof edge, exterior wall or eave area with this 31-inch roof & wall mount kit. The 360° swivel base helps fine-tune placement direction, while the adjustable arm structure supports cleaner angle positioning for a clearer sky-facing setup.
Key Features
- Roof & Wall Installation: Designed for exterior roof edge, wall and eave mounting scenarios.
- 360° Swivel Base: Helps adjust the mount direction during installation for a cleaner Starlink V5 placement angle.
- 31-Inch Raised Height: Lifts Starlink V5 above the mounting point to help reduce low roofline and wall obstructions.
- Adjustable Arm Structure: Supports angle positioning for different wall, eave and roof-edge layouts.
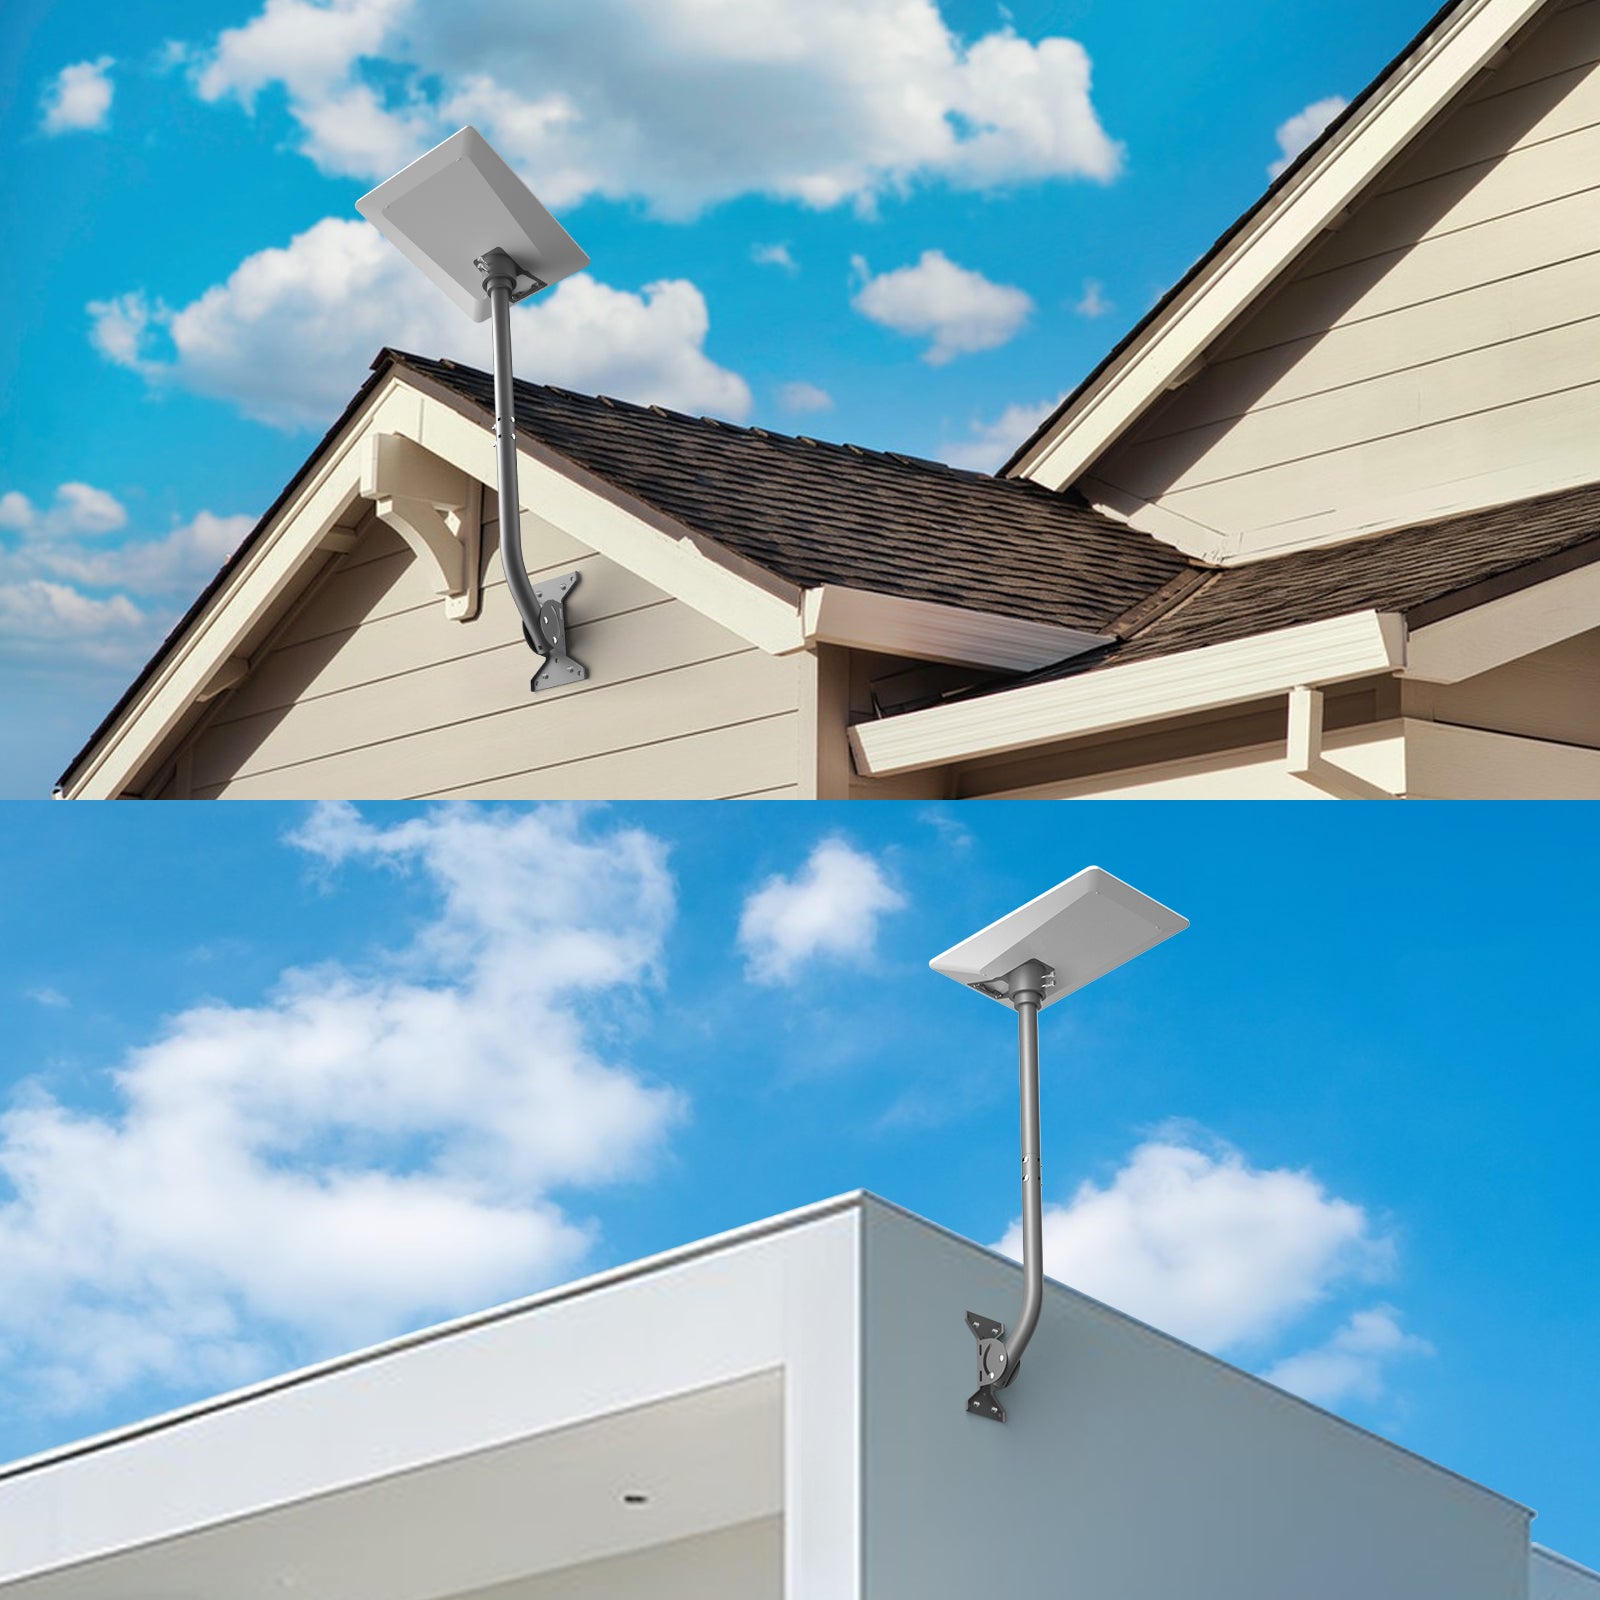
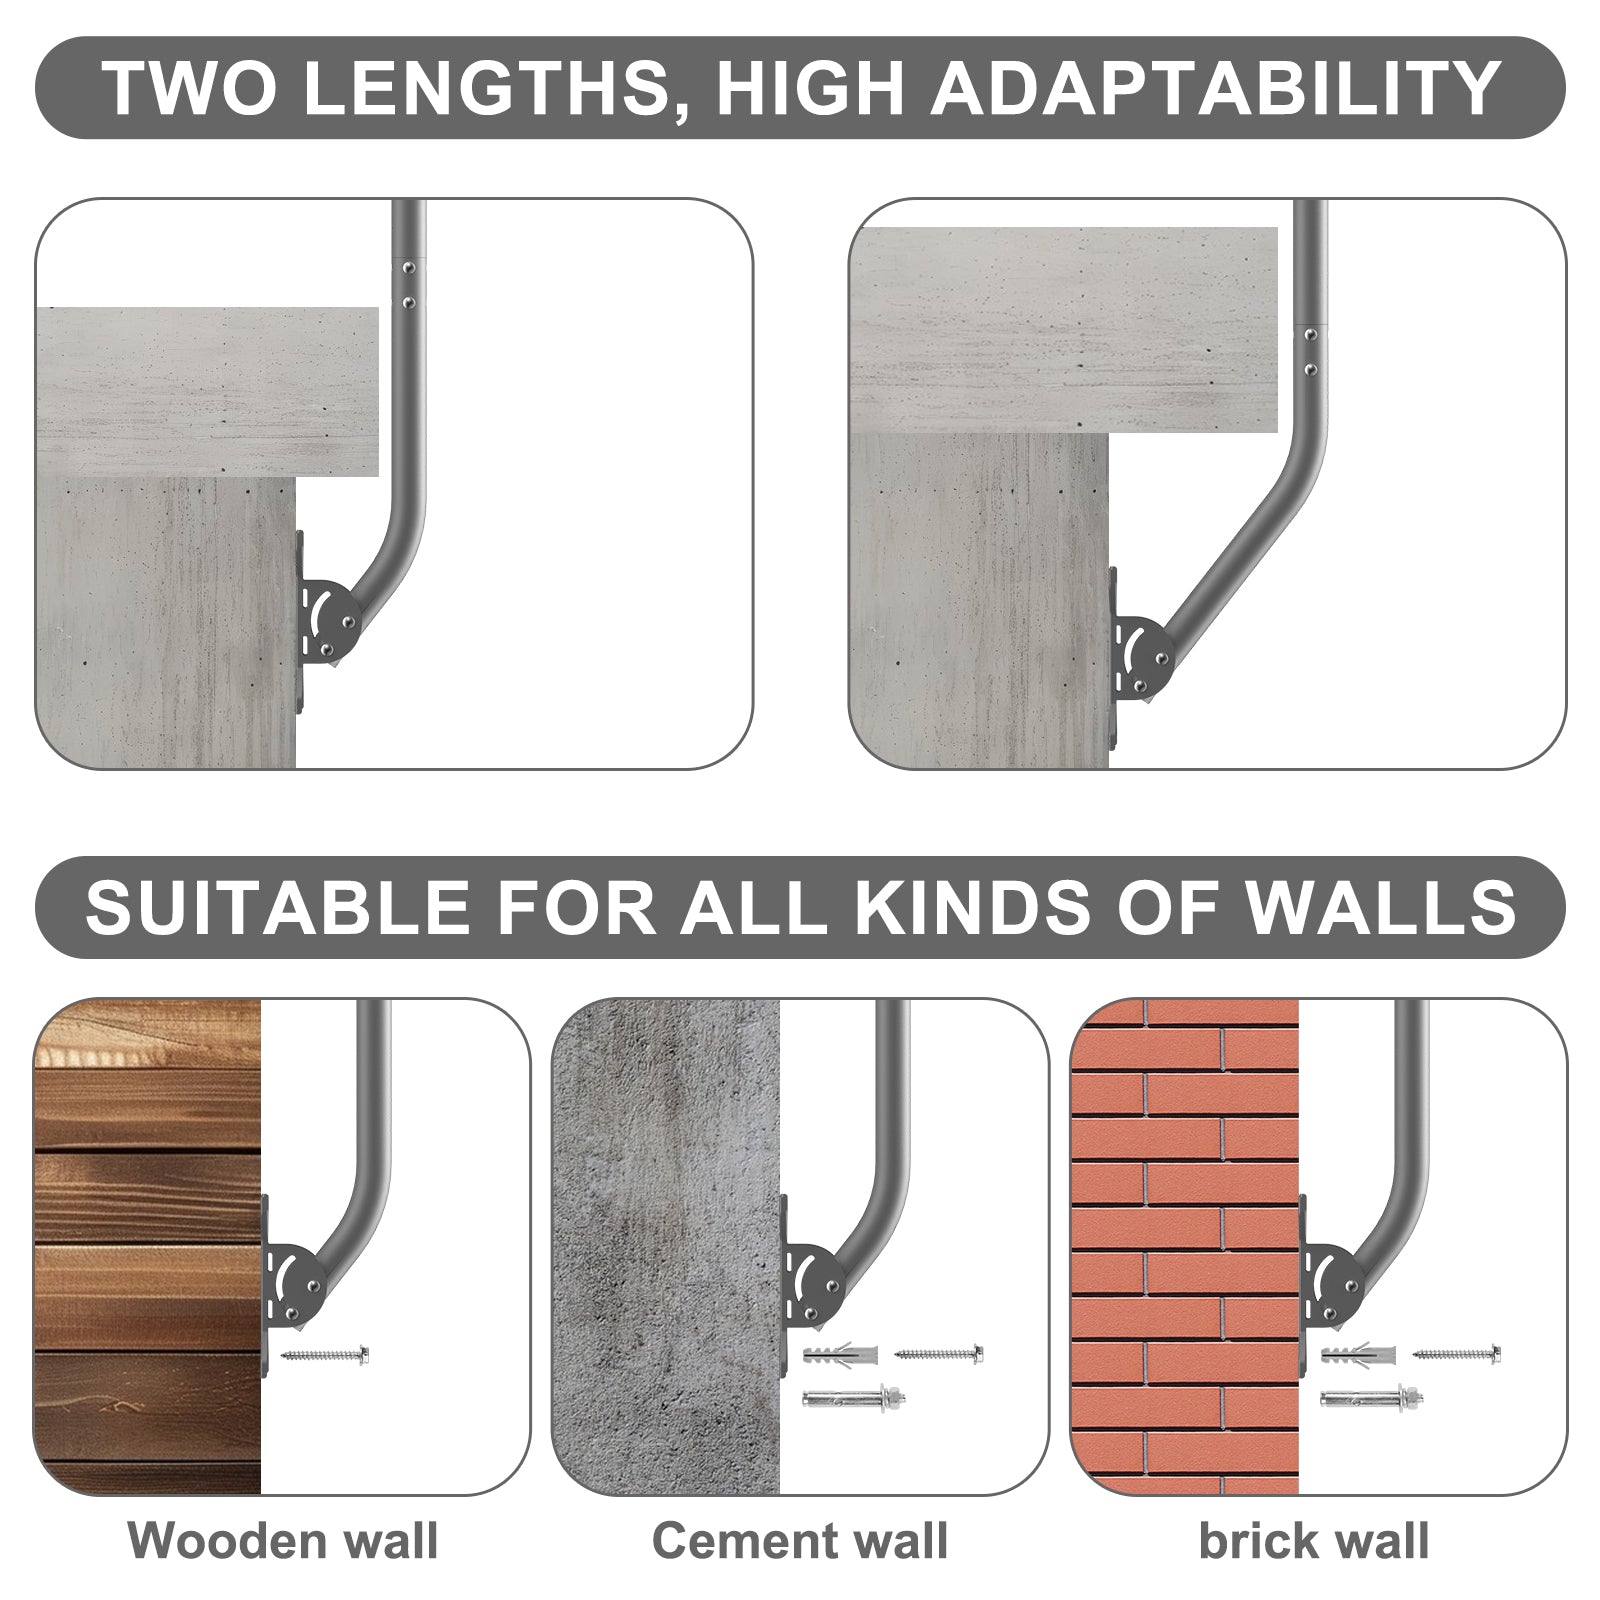
- Two-Length Structure: Product images show two installation lengths for better wall and eave adaptability.
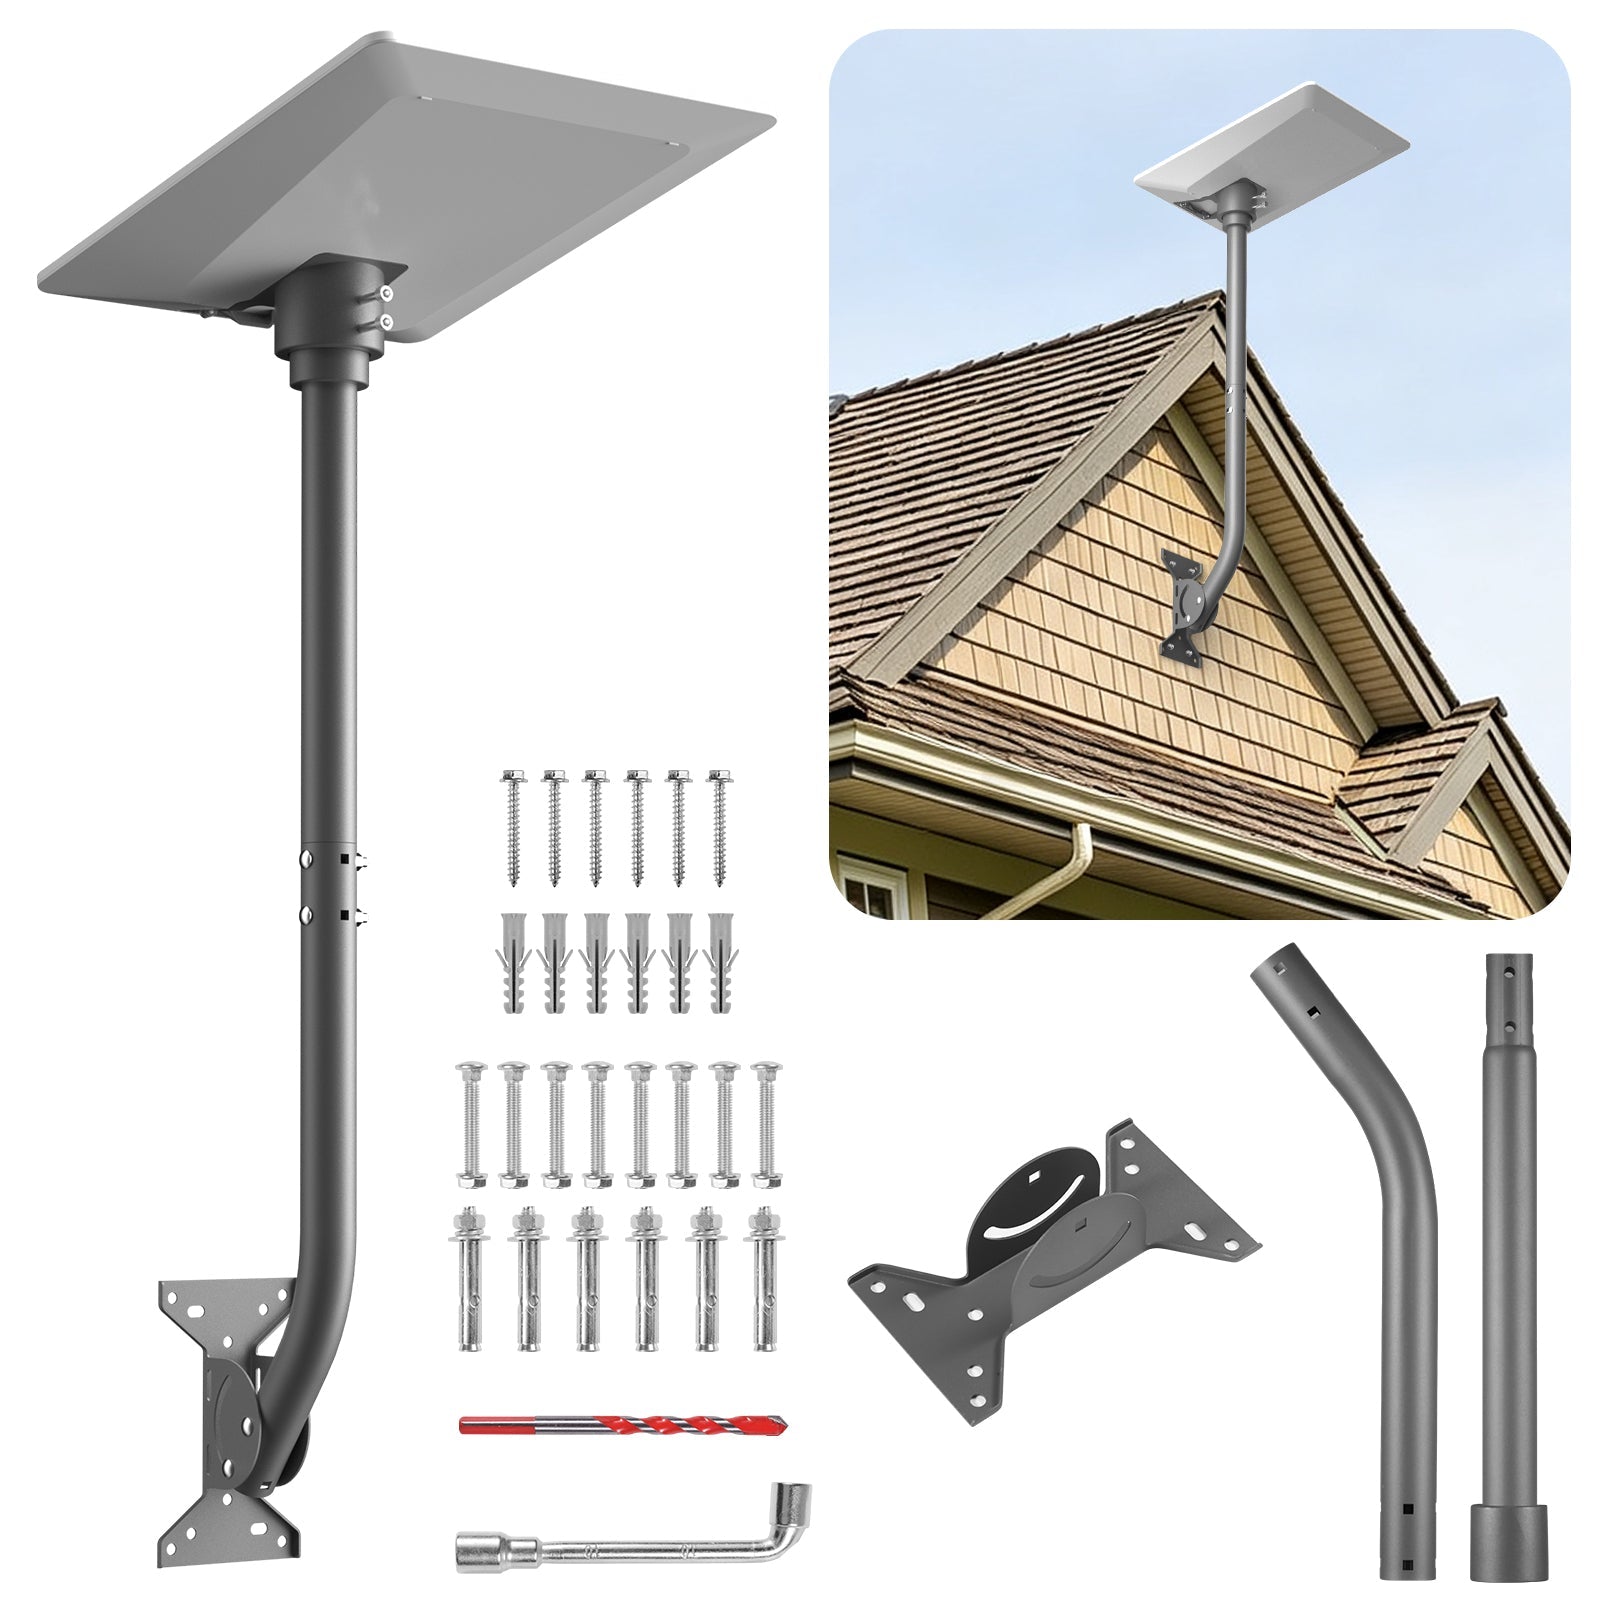
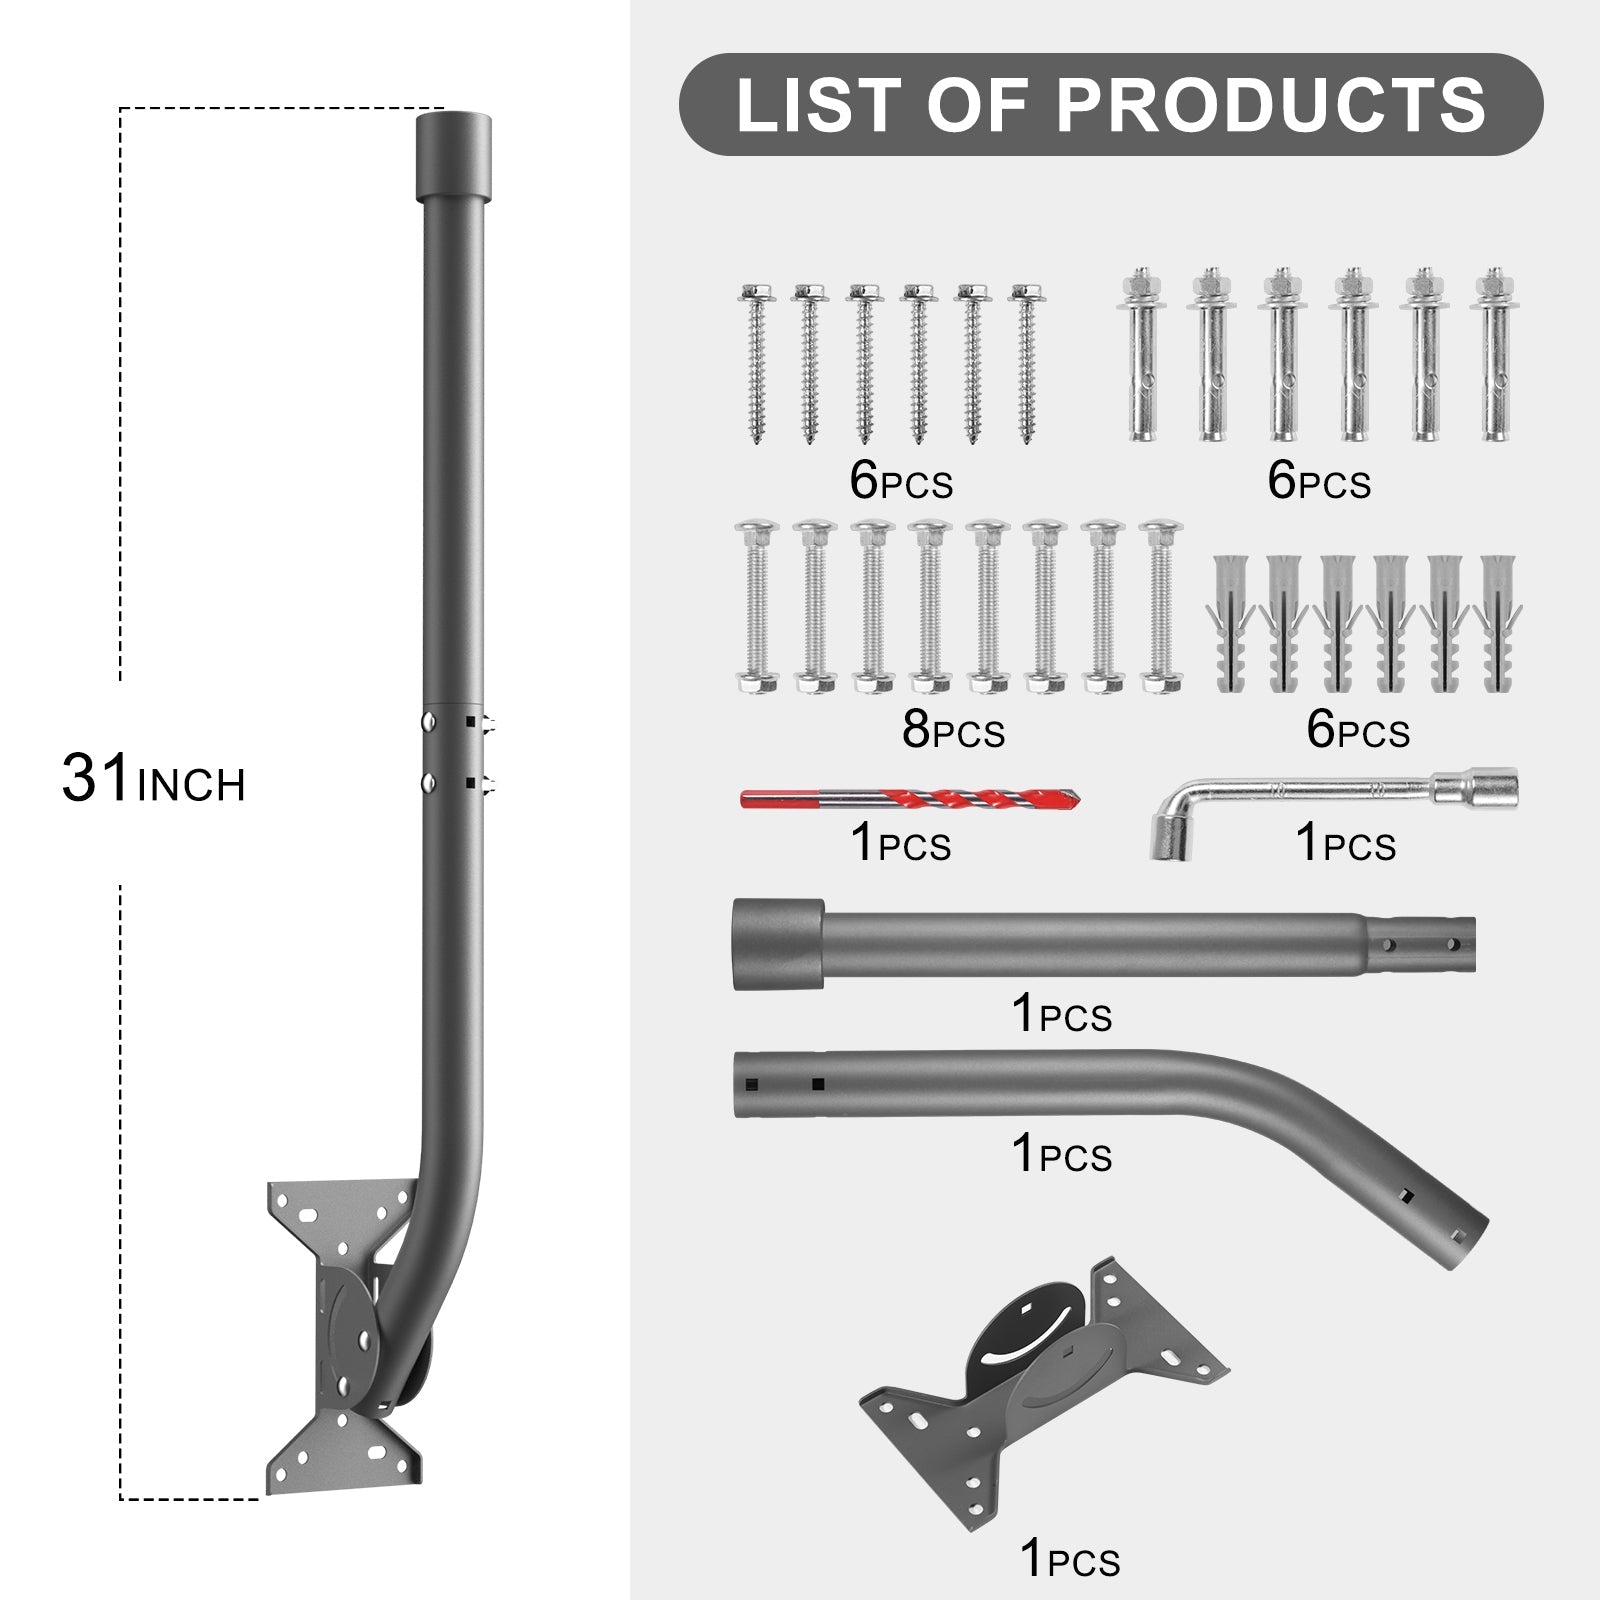
- Complete Hardware Kit: Product images show screws, expansion hardware, drill bit, wrench, tube sections and brackets.
- Gray Outdoor Finish: Neutral color blends with many exterior walls, rooflines and outdoor utility hardware.
Raise Starlink V5 Above Low Obstructions
A fixed roof or wall mount helps move Starlink V5 away from ground-level obstacles such as vehicles, fences, outdoor gear, people walking nearby and low roofline blockage. It also gives the setup a cleaner long-term installation position for homes, cabins, garages and remote work locations.
- Homes & Cabins: Keeps Starlink V5 in a cleaner elevated position.
- Garages & Workshops: Helps place the dish near a structure with better open-sky access.
- Remote Properties: Better for long-term internet setup than repeated ground placement.
- RV Sites: Useful for semi-fixed locations where a wall or structure mount is safer than loose ground placement.
360° Swivel Base + Adjustable Arm Positioning
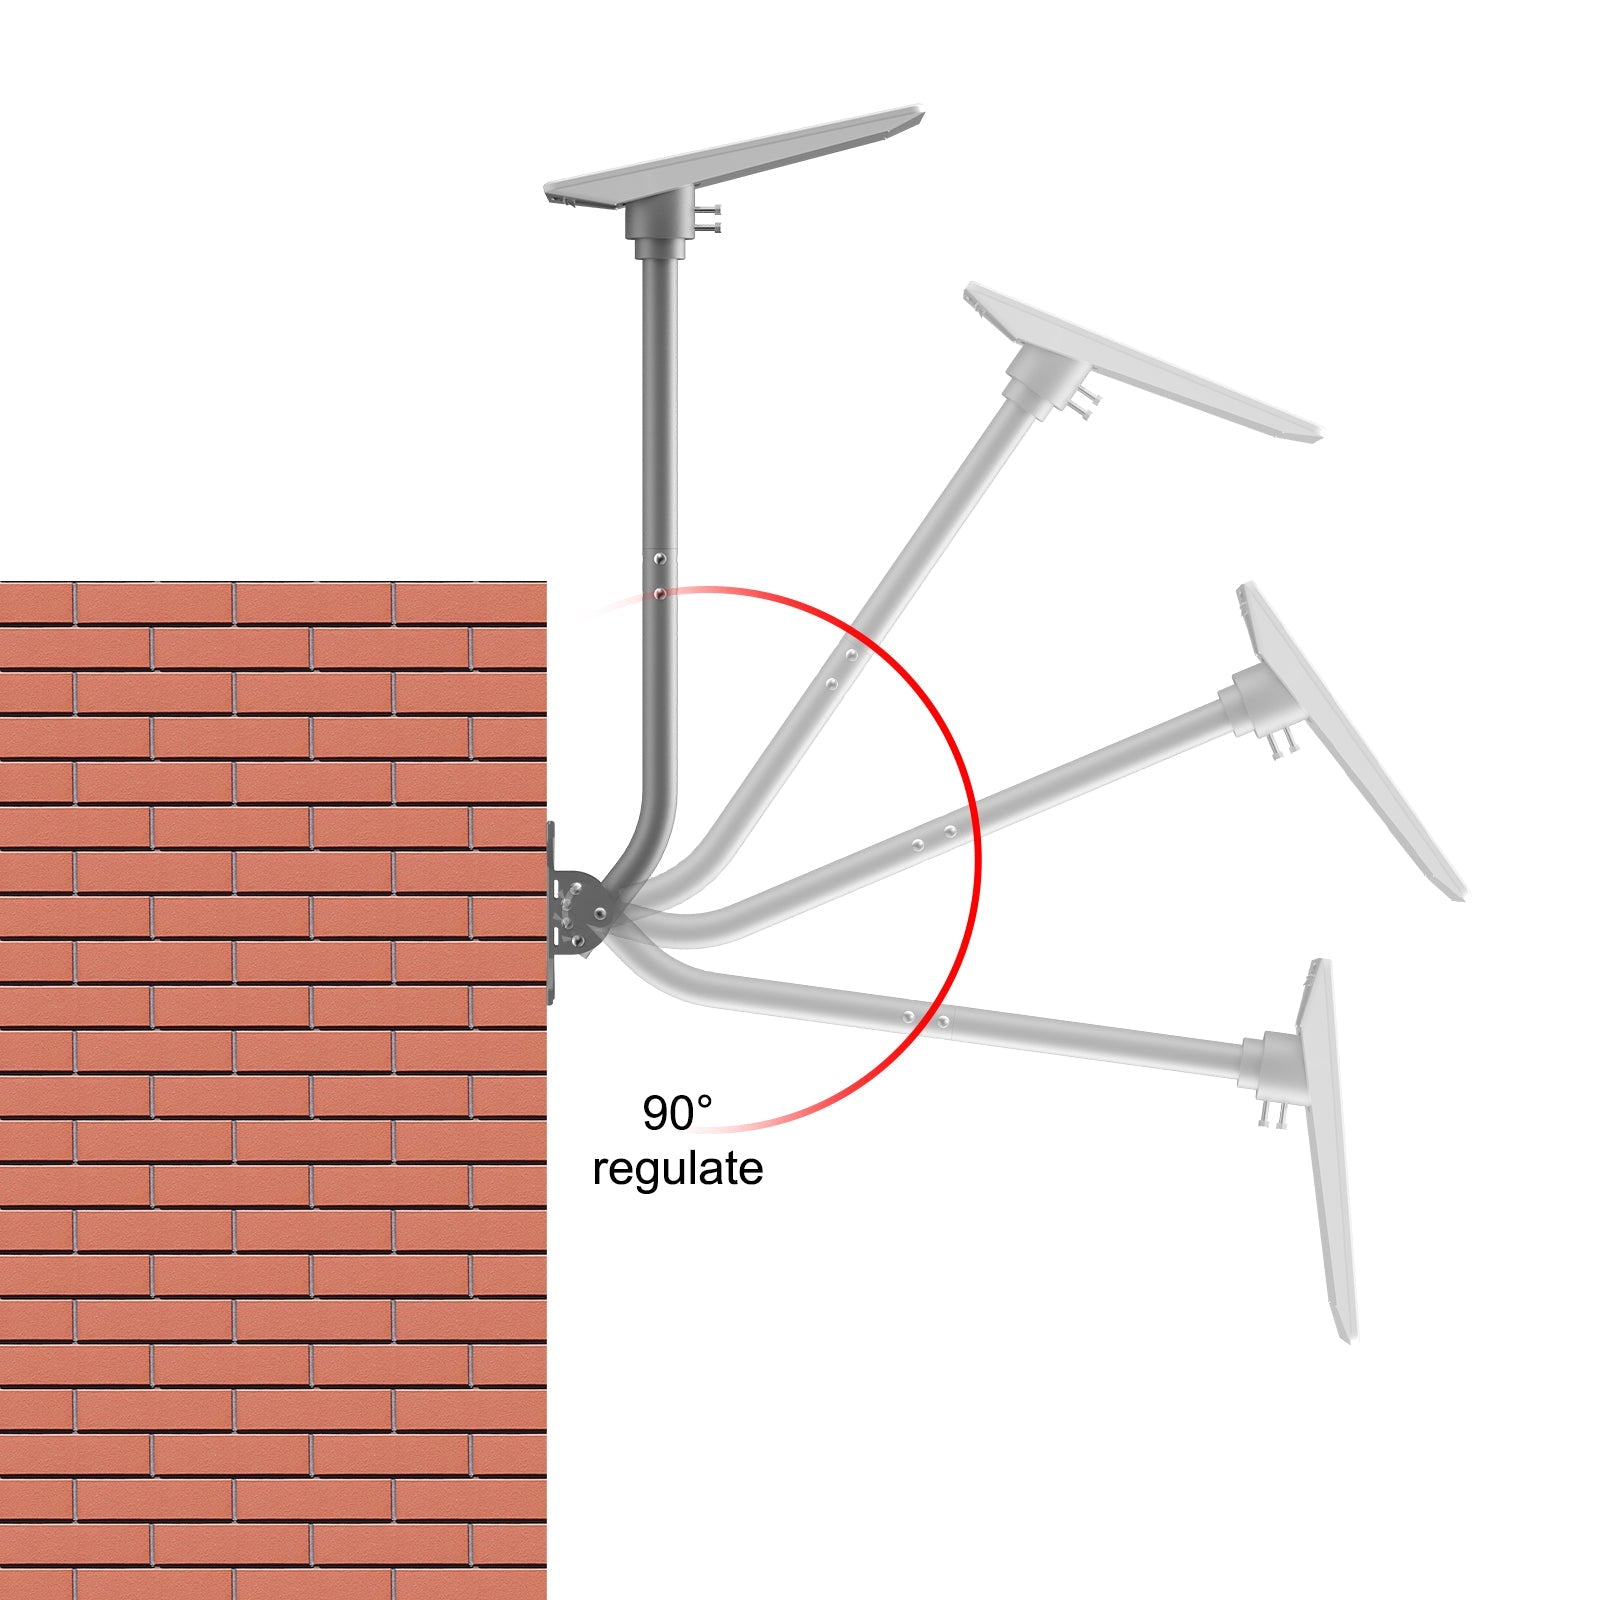
The product title highlights a 360° swivel base, while the current angle image shows “90° regulate.” These should work together as a clear product story: the base helps adjust direction, and the arm helps adjust installation angle.
- Swivel Base: Helps fine-tune direction after selecting the wall or eave mounting point.
- Arm Angle Adjustment: Helps position the pole away from the wall or roof edge.
- Cleaner Sky-Facing Setup: Gives installers more flexibility than a fixed straight bracket.
Two-Length Structure For Different Wall Conditions
Product images show two mounting lengths and installation examples for wooden wall, cement wall and brick wall. This makes the kit easier to explain as a flexible exterior mounting solution rather than a single-purpose bracket.
- Wooden Wall: Use suitable screws and confirm structural backing before drilling.
- Cement Wall: Use appropriate anchors and verify the surface is not cracked or loose.
- Brick Wall: Anchor into strong masonry and avoid damaged mortar or unstable bricks.
- Eave Area: Confirm the bracket is fixed into solid structure, not only decorative trim.
Complete Hardware Kit Shown Clearly
A mounting product needs to show exactly what customers receive. The current product image clearly presents the 31-inch height and hardware list, helping reduce hesitation before checkout.
- Main Mount Structure: 31-inch raised bracket shown in the product image.
- Tube Sections: Straight and angled tube pieces for wall and eave positioning.
- Mounting Base: Wall / roof mounting plate for fixed outdoor installation.
- Starlink V5 Adapter Bracket: Dish connection bracket shown in the product kit image.
- Hardware: Screws, expansion bolts, anchors, drill bit and wrench shown in the kit image.
Where This Mount Works Best
This mount is best for customers who want a cleaner fixed Starlink V5 setup on a structure rather than a temporary ground stand. It is especially useful when the best sky view is near a roof edge, exterior wall, garage, workshop or cabin.
- Exterior Walls: Good for garages, cabins, workshops and utility walls with solid backing.
- Eave / Roof Edge Areas: Helps raise the dish away from low roofline obstruction.
- Cabins & Rural Homes: Useful for long-term Starlink placement away from ground traffic.
- Remote Worksites: Helps create a fixed elevated internet setup for daily use.
Starlink V5 Compatibility Reminder
This product should be positioned as a Starlink V5 mount, not a Tesla vehicle fitment accessory. Customers should confirm their Starlink version and mounting interface before checkout.
- Product Type: Starlink V5 roof & wall mount with 360° swivel base
- SKU: XL0235
- Color: Gray
- Mount Style: Fixed roof / wall / eave mount
- Height Reference: Product image shows 31 inch mount height
- Best Use: Home, cabin, garage, workshop, RV site and remote internet setup
- Not Universal: Do not order for Starlink Mini, Gen 2, Gen 3, Standard, High Performance or other versions unless the mounting interface is confirmed separately.
Installation Notes
Roof and wall mounting is more demanding than simple indoor accessories. For safety and long-term stability, professional installation is recommended, especially for roof edges, brick walls, high locations and windy areas.
- Step 1: Confirm the selected location has a clear sky view and solid structural backing.
- Step 2: Test-position the bracket and confirm cable routing before drilling.
- Step 3: Mark the mounting holes and choose hardware suitable for the wall or roof surface.
- Step 4: Drill carefully, install anchors or bolts, and secure the mounting plate.
- Step 5: Assemble the tube sections and Starlink V5 adapter bracket.
- Step 6: Adjust the swivel base and arm angle, then tighten all fasteners.
- Step 7: Route the cable with drip loops and strain relief so water does not run directly into connectors.
Why Choose A 360° Roof & Wall Mount?
| Scenario | Tesstudio 360° Swivel Mount | Temporary Ground Stand |
|---|---|---|
| Sky view | Raises the dish above many low obstructions | Can be blocked by cars, people, fences or outdoor gear |
| Direction adjustment | 360° swivel base helps fine-tune placement direction | Limited by ground position and stand direction |
| Angle positioning | Adjustable arm helps position the dish away from wall or roof edge | Often limited by flat ground and short stand height |
| Cable management | Easier to plan a fixed cable route along a wall or roof edge | Cables may cross walkways or outdoor activity areas |
| Best for | Homes, cabins, garages, workshops and fixed outdoor setups | Short-term camping or portable temporary use |
Outdoor Mounting Safety Notes
- Use A Load-Bearing Surface: Mount only to strong structural material, not decorative trim or weak siding.
- Weather Matters: Wind, snow, ice, heavy rain and storms can increase stress on outdoor mounts.
- Check Fasteners: Inspect screws, bolts and brackets regularly after weather changes.
- Plan Cable Routing: Avoid sharp edges, hot surfaces, pinch points and standing water.
- Professional Installation: Recommended for roof, high-wall, brick, masonry or complex exterior installations.
Built For Real Starlink V5 Outdoor Use
- Home Internet: Cleaner long-term Starlink placement for houses and garages.
- Cabins: Useful where ground-level placement is blocked by trees, decks or terrain.
- Workshops: Keeps the dish mounted higher and away from work traffic.
- Rural Properties: Better for fixed outdoor setups that need repeated daily reliability.
- RV Sites: Works for semi-fixed outdoor locations when mounted to a suitable structure.
Recommended Page Content Order
- First Screen: 360° Swivel Roof & Wall Mount For Starlink V5 + roof/eave installation scene.
- Second Screen: 360° base positioning and adjustable arm explanation.
- Third Screen: 31-inch raised height and obstruction-reduction use case.
- Fourth Screen: Two-length structure and wooden / cement / brick wall compatibility notes.
- Fifth Screen: Complete hardware kit and installation requirements.
- Final Screen: Load-bearing surface warning, professional installation note and FAQ.
Frequently Asked Questions
Which Starlink model is this mount designed for?
This listing is for Starlink V5. Do not order for Starlink Mini, Gen 2, Gen 3, Standard, High Performance or other versions unless the mounting interface is confirmed separately.
What does the 360° swivel base do?
The 360° swivel base is intended to help adjust the mount direction during installation. Tesstudio should add a close-up image of this base so customers can clearly understand the rotation structure.
Can it be installed on both roof and wall?
Yes. The product is positioned as a roof and wall mount kit, with images showing exterior wall, eave and roof-edge installation scenarios.
How tall is the mount?
The product image shows a 31 inch height reference for the assembled mount structure.
Why does one image say 90° regulate?
The current product image shows a 90° arm adjustment diagram, while the product title says 360° swivel base. The page should explain both clearly or correct the specification if one value is inaccurate.
What is included in the kit?
Product images show tube sections, mounting brackets, dish adapter bracket, screws, expansion hardware, drill bit and wrench. Final package contents should match the selected product listing.
Does installation require drilling?
Yes. Roof or wall installation requires drilling and secure fastening into a suitable load-bearing surface.
Can I install it myself?
DIY installation may be possible for experienced users, but professional installation is recommended for roof edges, high walls, brick, masonry, complex surfaces or windy locations.
Can it be mounted on siding or fascia only?
Do not mount only to weak siding, thin panels, loose fascia or decorative trim. It should be anchored into strong structural material that can support outdoor wind load.
Will it guarantee better Starlink signal?
No mount can guarantee better signal by itself. It can help place the dish higher and away from some obstructions, but Starlink performance still depends on sky visibility, location, obstructions and service conditions.
Is the Starlink dish included?
No. This product includes the Starlink V5 roof & wall mount kit only. Starlink dish, router, cable and other accessories are not included unless specifically stated.
질문과 답변
이메일, 실시간 채팅, 그리고 자세한 설치 가이드를 통해 도움을 드립니다. 또한, 인플루언서들이 직접 출연하는 단계별 튜토리얼 영상을 제공하여 설치 과정을 도와드립니다.
당사는 1년 보증을 제공합니다(일부 제품은 2년).
네, 설치 후 제품을 제거해도 차량의 원래 배선 하네스에 영향을 미치지 않습니다.
고객이 제품을 받은 후 품질에 문제가 있는 경우 무료로 반품 및 교환해 드립니다.

Subscribe
Join Us - Enjoy our latest news and exclusive discounts & gifts.