
Owner Brief: Jump Starting a Tesla Model S Low-Voltage Battery
Owner Brief · Direct Tesla DIY Guidance
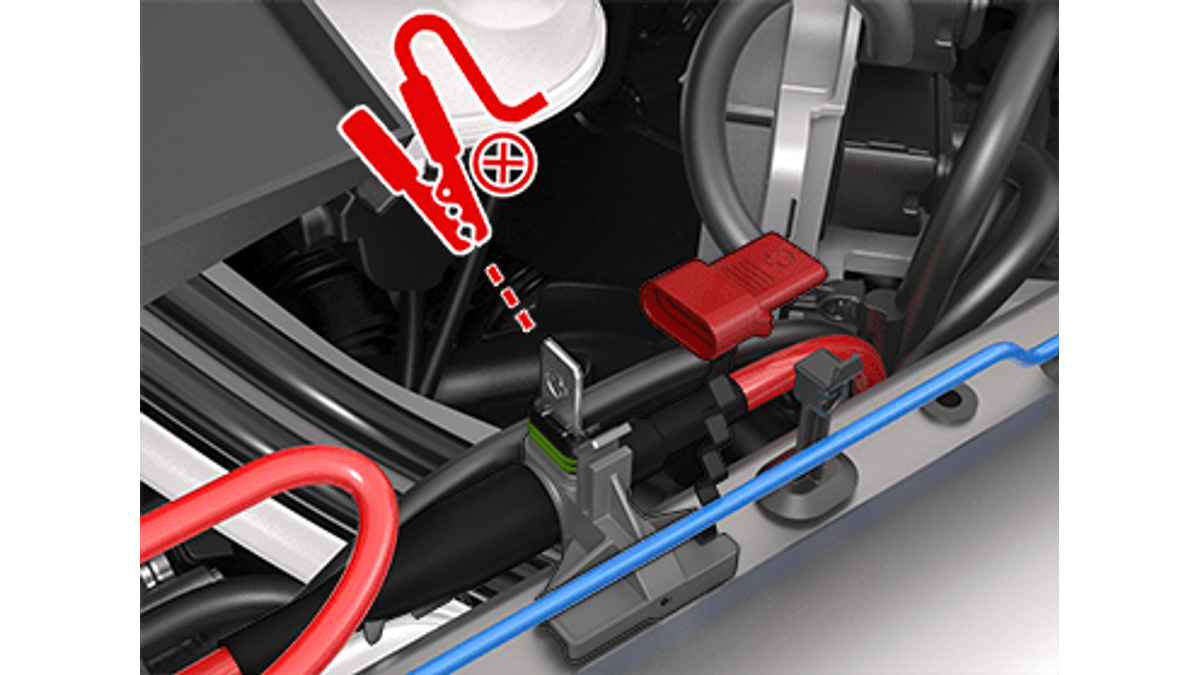
For a Tesla Model S low-voltage jump start, use an external low-voltage supply and follow the current Tesla DIY page for the vehicle. Tesla requires the covered positive jump post and the documented negative ground location, warns against short circuits, and says to remove the black negative cable first. Model S must not be used to jump-start another vehicle.
30-Second Brief
- This Owner Brief is dated October 22, 2026 in America/Los_Angeles. It summarizes standing Tesla Model S DIY guidance and does not claim the procedure changed today.
- Tesla's current Model S guide assumes an external low-voltage supply such as a portable jump starter.
- The procedure requires opening the hood, removing the maintenance panel, disconnecting the low-voltage battery connector, then using the covered positive jump post and specified ground point.
- Tesla says connector appearance and positive-post location may vary by manufacture date.
- Tesla warns against short circuits and says Model S cannot be used to jump-start another vehicle.
- After the touchscreen wakes and external support is no longer needed, disconnect the black negative cable first and restore the battery connector and maintenance panel.
What Happened
Tesla maintains a current Model S Do It Yourself procedure for supplying external low-voltage power when the vehicle cannot wake normally. The page combines connection order, under-hood access, electrical cautions and a manufacture-date boundary for the positive jump-post location.
This brief enters Tesstudio's mandatory fallback ladder after more than five no-publication hours while the Los Angeles daily count remains below four. A new Tesla Q3 10-Q was added to the existing Q3 event page rather than duplicated; same-window alternatives were already covered, future-only or below a hard evidence gate, so the workflow expanded to useful current owner documentation.
What Is Confirmed
- External supply: Tesla's procedure assumes a low-voltage source such as a portable jump starter.
- Connector step: the current guide instructs owners to lift the locking tab and release the low-voltage battery connector before attaching external power.
- Positive connection: remove the red cover and connect the red cable to the positive jump post; Tesla says its position may differ by manufacture date.
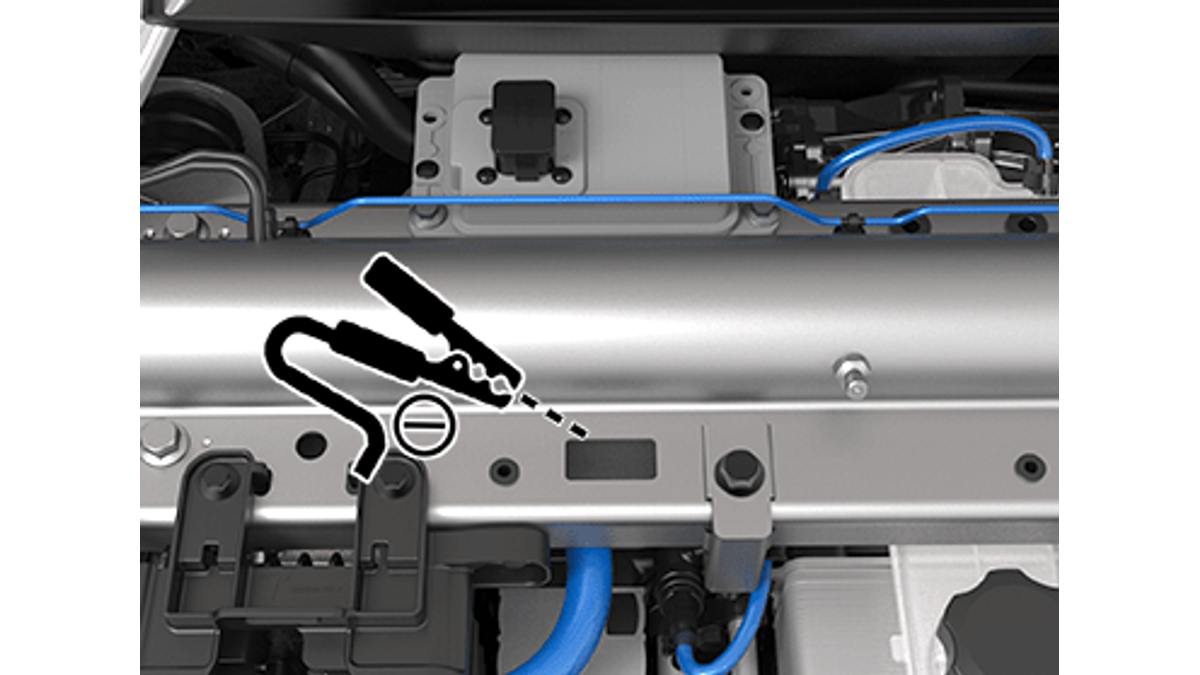
- Negative connection: connect the black cable to the vehicle at the ground location shown in Tesla's diagram.
- Wake-up time: Tesla says the touchscreen may require several minutes to receive enough power to wake.
- Disconnect order: remove both cables beginning with the black negative cable, then re-engage the battery connector and locking tab.
- Damage prevention: Tesla warns against reversed or shorted leads and against allowing the positive cable to contact other metal components.
- Donor-vehicle boundary: Model S cannot be used to jump-start another vehicle.
What Remains Unconfirmed
A successful wake-up does not identify why the low-voltage system became unavailable, prove the battery is healthy or confirm that the vehicle is ready to drive. Repeat failures, persistent alerts or a vehicle that will not enter Drive require diagnosis rather than repeated jump-start attempts.
The current DIY page also does not establish that every portable power supply is compatible with every Model S build. Owners must follow the supply manufacturer's instructions and confirm that Tesla's current regional guide applies to the specific vehicle. Earlier Model S generations can use materially different access procedures.
Why It Matters
Low-voltage recovery is sensitive to connection point, polarity and vehicle generation. Tesla's own document preserves those boundaries and explicitly notes that the positive-post location can vary. A short summary is useful only if it sends the owner back to the live guide rather than encouraging a model-year guess.
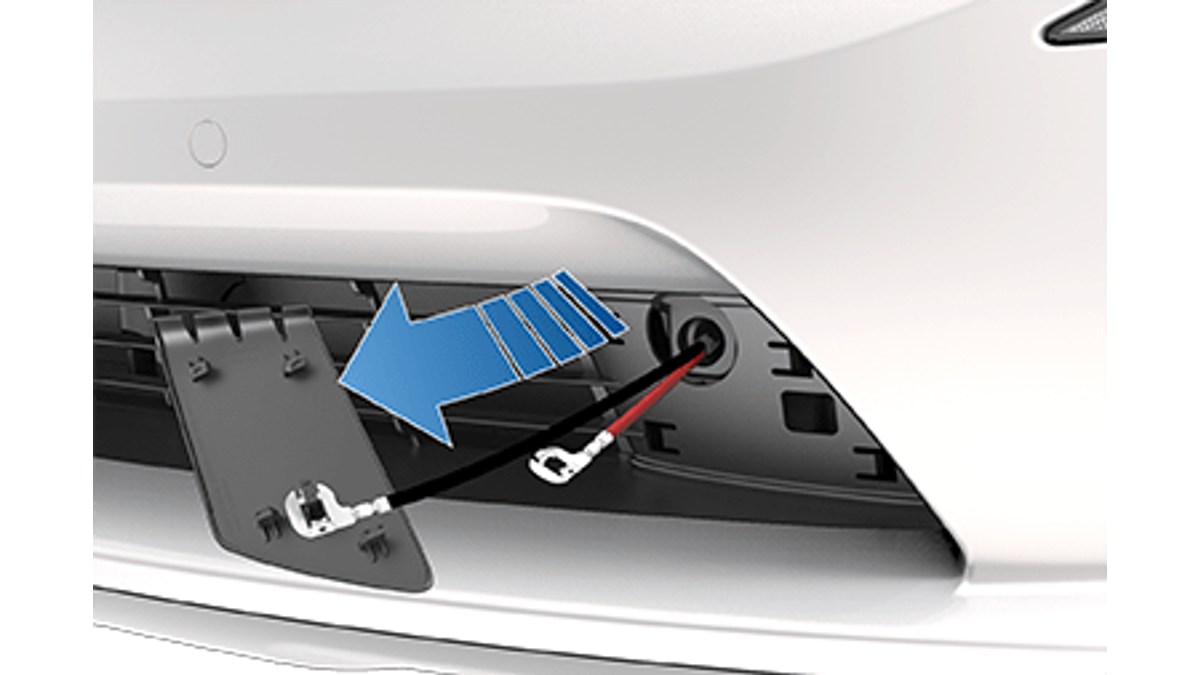
The hood-release terminals are a separate step. Tesla says the front tow-eye leads release the hood latches but do not charge the low-voltage battery; the actual jump-start connections are under the hood.
What Tesla Owners Should Know
- Open the current guide. Confirm the regional Model S DIY page applies to the vehicle and manufacture period.
- Use a suitable external supply. Follow its manufacturer instructions as well as Tesla's sequence.
- Control polarity. Never reverse cables, touch leads together or let the positive cable contact nearby metal.
- Use Tesla's ground point. Do not substitute an arbitrary under-hood metal part.
- Allow time to wake. The touchscreen may need several minutes after power is applied.
- Disconnect black first. Restore the connector housing, locking tab and maintenance panel after support is removed.
- Escalate repeat failures. Preserve alerts and contact Tesla service or roadside assistance when the problem returns or the car remains unavailable.
Tesstudio Analysis
This Owner Brief scores 72.8. Source authority and factual confidence are high because two directly readable Tier 0 Tesla DIY documents define the jump-post sequence, connector handling, hood-access boundary and electrical cautions. Timeliness and event magnitude are lower because this is standing owner guidance, not a new product announcement.
The key takeaway is procedural restraint. External power may restore access and wake the vehicle, but it does not diagnose the root cause. The correct outcome after a repeated failure is service evidence and diagnosis, not progressively more improvised connections.
Related Tesla News Resources
For separate low-voltage procedures, Tesstudio also maintains Model 3, Model Y and Model X owner briefs. No Related Gear module is included because the evidence does not establish one universally compatible jump starter for every Model S build.
Sources & Reporting Notes
- Tesla Model S DIY — Jumpstarting the Low Voltage Battery — primary instructions for connector handling, jump posts, cautions, wake-up timing and disconnect order.
- Tesla Model S DIY — Opening the Hood with No Power — primary boundary showing that the tow-eye leads release the hood but do not charge the low-voltage battery.
Reporting note: Both Tesla pages were read directly before publication. The two diagrams are Tesla manual assets fitted to 1200-by-675 canvases without factual alteration. Public video and community items were reviewed only as discovery signals and are not used as evidence.
Update & Correction Log
October 22, 2026: Initial Owner Brief, published in mandatory fallback mode with the America/Los_Angeles daily count below four.



Leave a comment
This site is protected by hCaptcha and the hCaptcha Privacy Policy and Terms of Service apply.