Starlink V5 Roof & Wall Mount - 30° Tilt Adjustment
15%OFF
US$59+18%OFF
US$159+20%OFF
US$299+
Check the selected Tesla model, model year, and option before checkout. If this product has a Car Model or Compatible Model selector, choose the option that matches your vehicle.
- Use the product images and variant name to confirm the correct version.
- If you are unsure about fitment, contact Tesstudio with your Tesla model and production year before ordering.
Tesstudio installation support is available for Tesla owners who need help choosing, installing, or troubleshooting accessories.
Most Tesstudio accessories are designed for straightforward DIY installation. For powered upgrades, wiring, lighting, or large exterior parts, professional installation may be recommended.
Local installation and technical support
- Address: 14761 Franklin Ave # G, Tustin, CA 92780
- Technical support: +1 (657) 543-9876 or +1 (657) 565-1007
- Support hours: Monday-Friday, 8:30 AM-5:30 PM
The phone numbers above are for technical installation support only. For orders, shipping, returns, or general customer service, contact:
- Email: support@tesstudio.com
- WhatsApp: +1 714 317 9647
Tesstudio checks fit, material, and daily-use durability before listing products for Tesla owners.
- Eligible products include warranty support for non-human damage issues.
- If a product arrives damaged or does not fit as expected, keep the packaging and contact us with photos so we can help quickly.
In-stock items are usually processed within 1-2 business days. Delivery time depends on destination, product size, and stock status.
- Orders over $99 qualify for free standard shipping where available.
- Oversized, remote-area, pre-order, and special-market items follow the terms shown on the product page.
- Tracking is provided after dispatch.
Need help before or after purchase?
Contact Tesstudio support:
WhatsApp
+1 714 317 9647
حدِّد الخيارات
Tesstudio Starlink V5 Roof & Wall Mount Kit
Mount your Starlink V5 higher and cleaner on a roof edge, exterior wall or eave area with this fixed roof & wall mount kit. The 33-inch raised structure helps move the dish away from low roofline obstructions, while the adjustable bracket supports cleaner angle positioning for outdoor setup.
Key Features
- Roof & Wall Installation: Designed for exterior roof edge, wall and eave mounting scenarios.
- Starlink V5 Setup: Built for Starlink V5 fixed outdoor installation needs.
- 33-Inch Raised Mount: Helps lift the dish above the mounting point for a cleaner sky-facing position.
- Tilt Adjustment: Adjustable bracket structure helps fine-tune dish angle during installation.
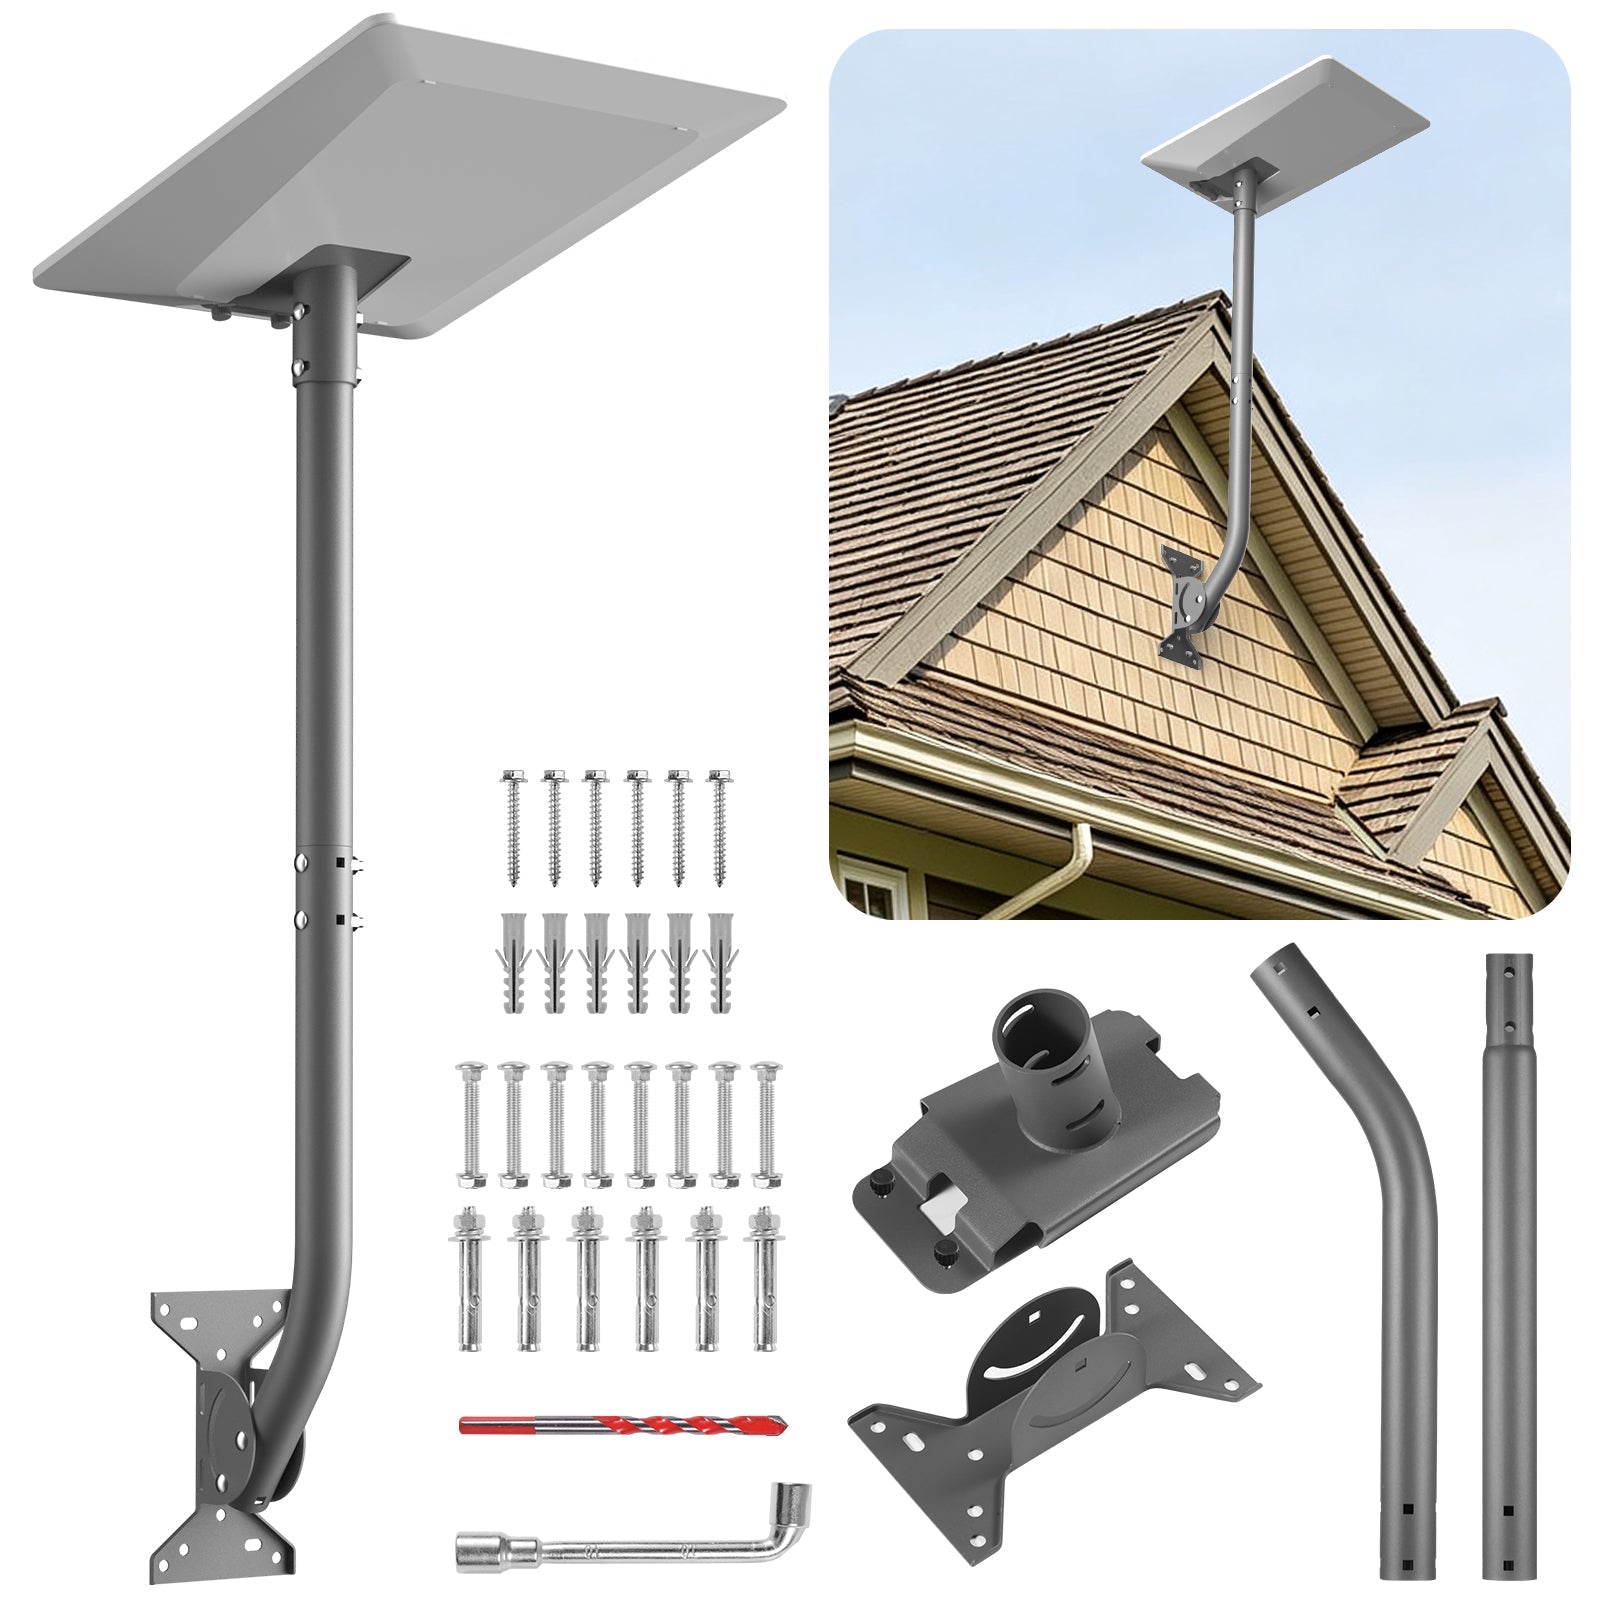
- Complete Hardware Kit: Product images show screws, expansion hardware, drill bit, wrench, tube sections and brackets.
- Gray Outdoor Finish: Neutral finish blends with many exterior walls, rooflines and utility hardware.
- Cleaner Fixed Setup: Better for homes, cabins, garages and workshops than leaving the dish on a temporary ground stand.
Raise Starlink V5 Above Low Obstructions
A fixed roof or wall mount helps move Starlink V5 away from ground-level obstacles such as vehicles, fences, outdoor gear, people walking nearby and low roofline blockage. It also gives the setup a cleaner long-term installation position for homes, cabins and remote work locations.
- Homes & Cabins: Keeps the dish in a cleaner elevated position.
- Garages & Workshops: Helps place the dish near a structure with better open-sky access.
- Remote Properties: Better for long-term internet setup than repeated ground placement.
- RV Sites: Useful for semi-fixed locations where a wall or structure mount is safer than loose ground placement.
Adjustable Angle For Cleaner Positioning
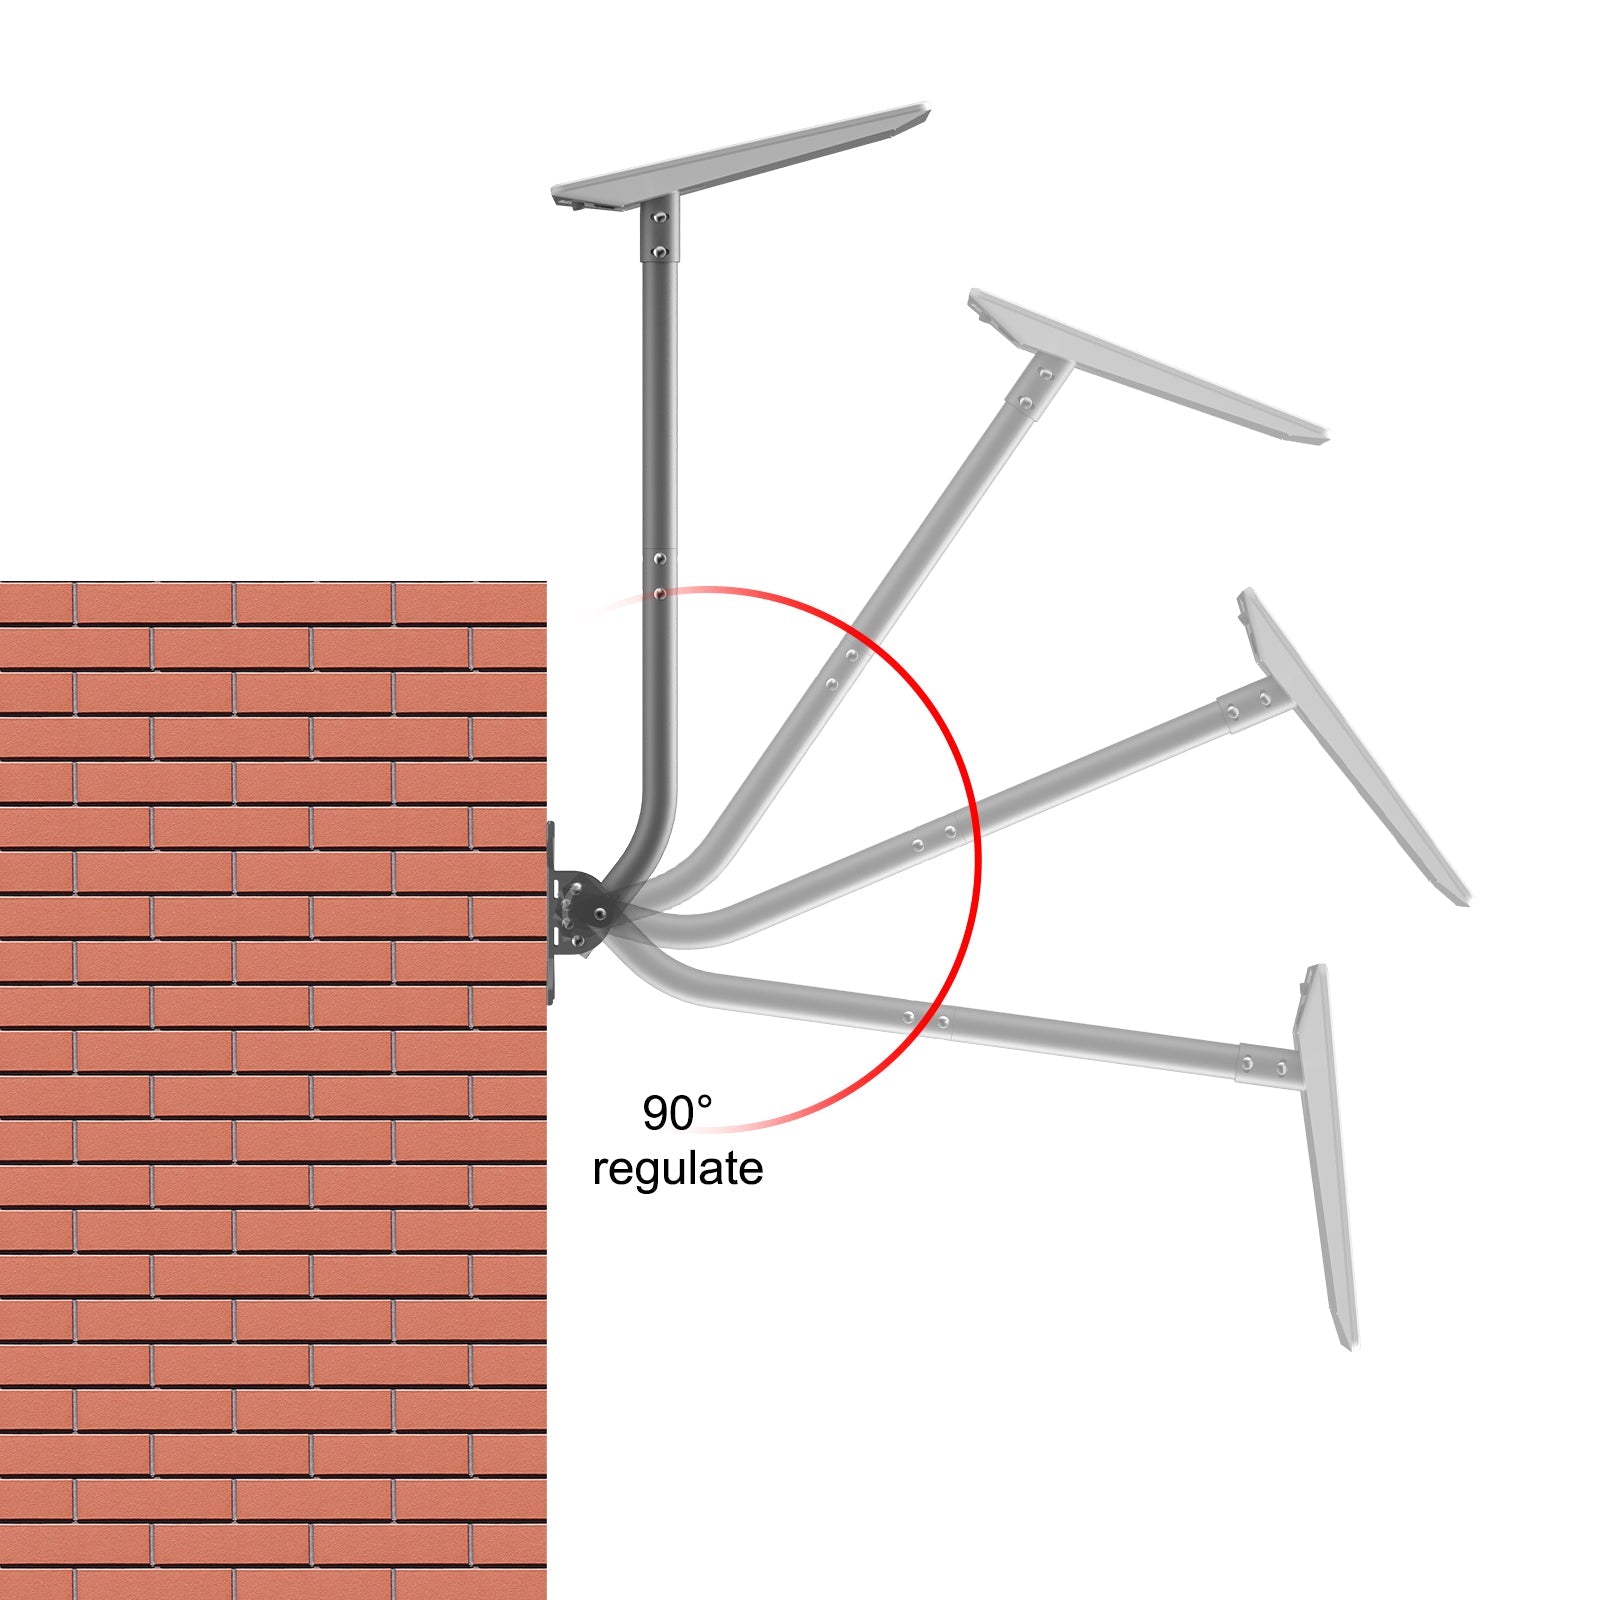
The adjustable bracket helps position the dish after the mount is installed. This is useful when the wall, eave or roof edge is not perfectly aligned with the desired sky-facing direction.
- Wall Mounting: Helps angle the dish away from the wall line.
- Eave Mounting: Helps position the dish above nearby roof edges.
- Cleaner Setup: Reduces the need for improvised brackets or DIY angle adapters.
Two-Length Structure For Different Wall Conditions
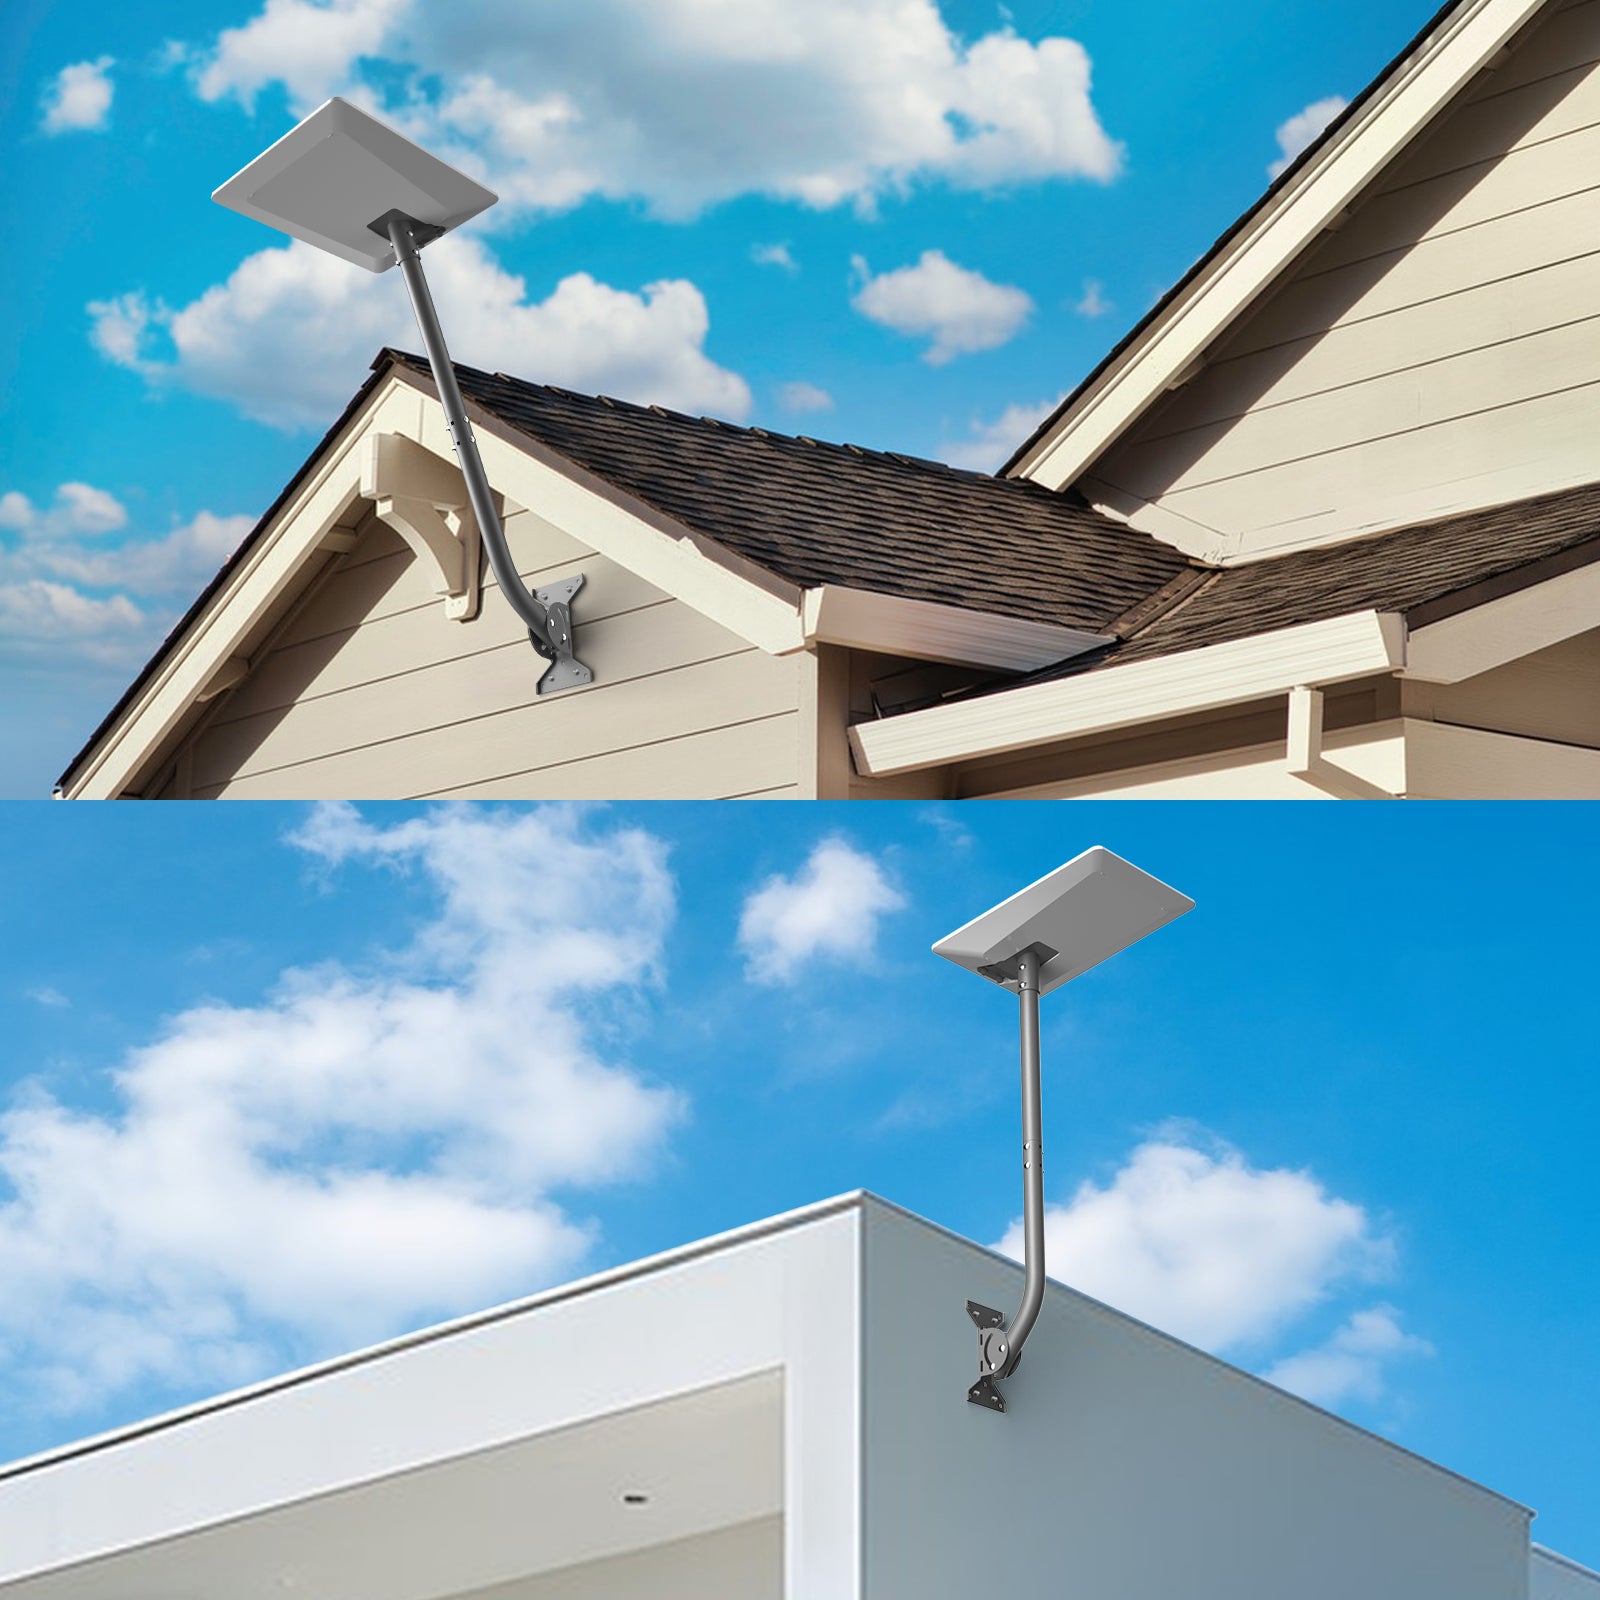
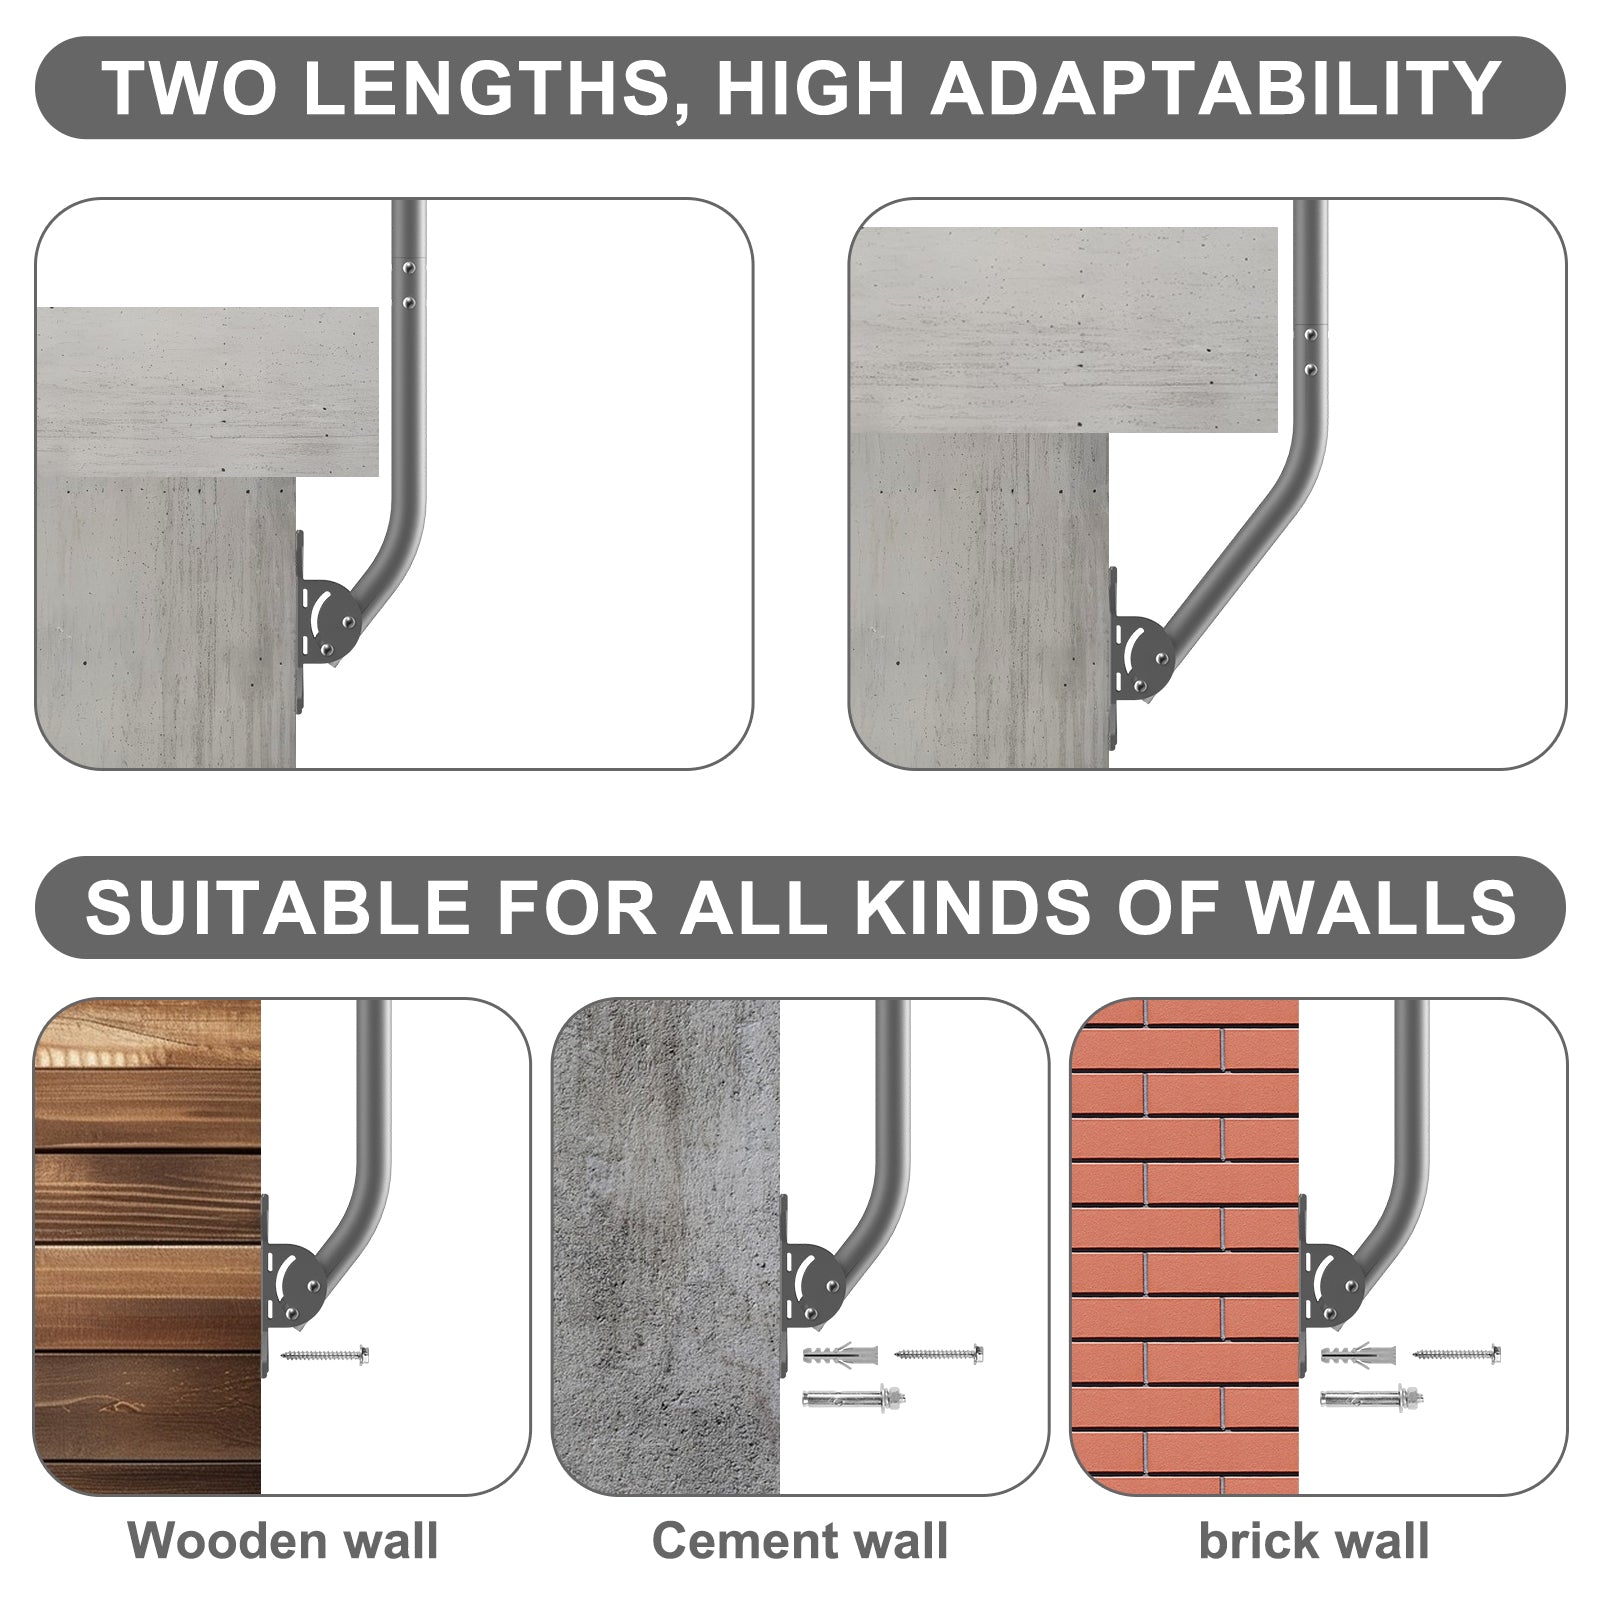
Product images show two mounting lengths and installation examples for wooden wall, cement wall and brick wall. This makes the kit easier to explain as a flexible exterior mounting solution rather than a single-purpose bracket.
- Wooden Wall: Use suitable screws and confirm structural backing before drilling.
- Cement Wall: Use appropriate anchors and verify the surface is not cracked or loose.
- Brick Wall: Anchor into strong masonry and avoid damaged mortar or unstable bricks.
Complete Kit Contents Shown Clearly
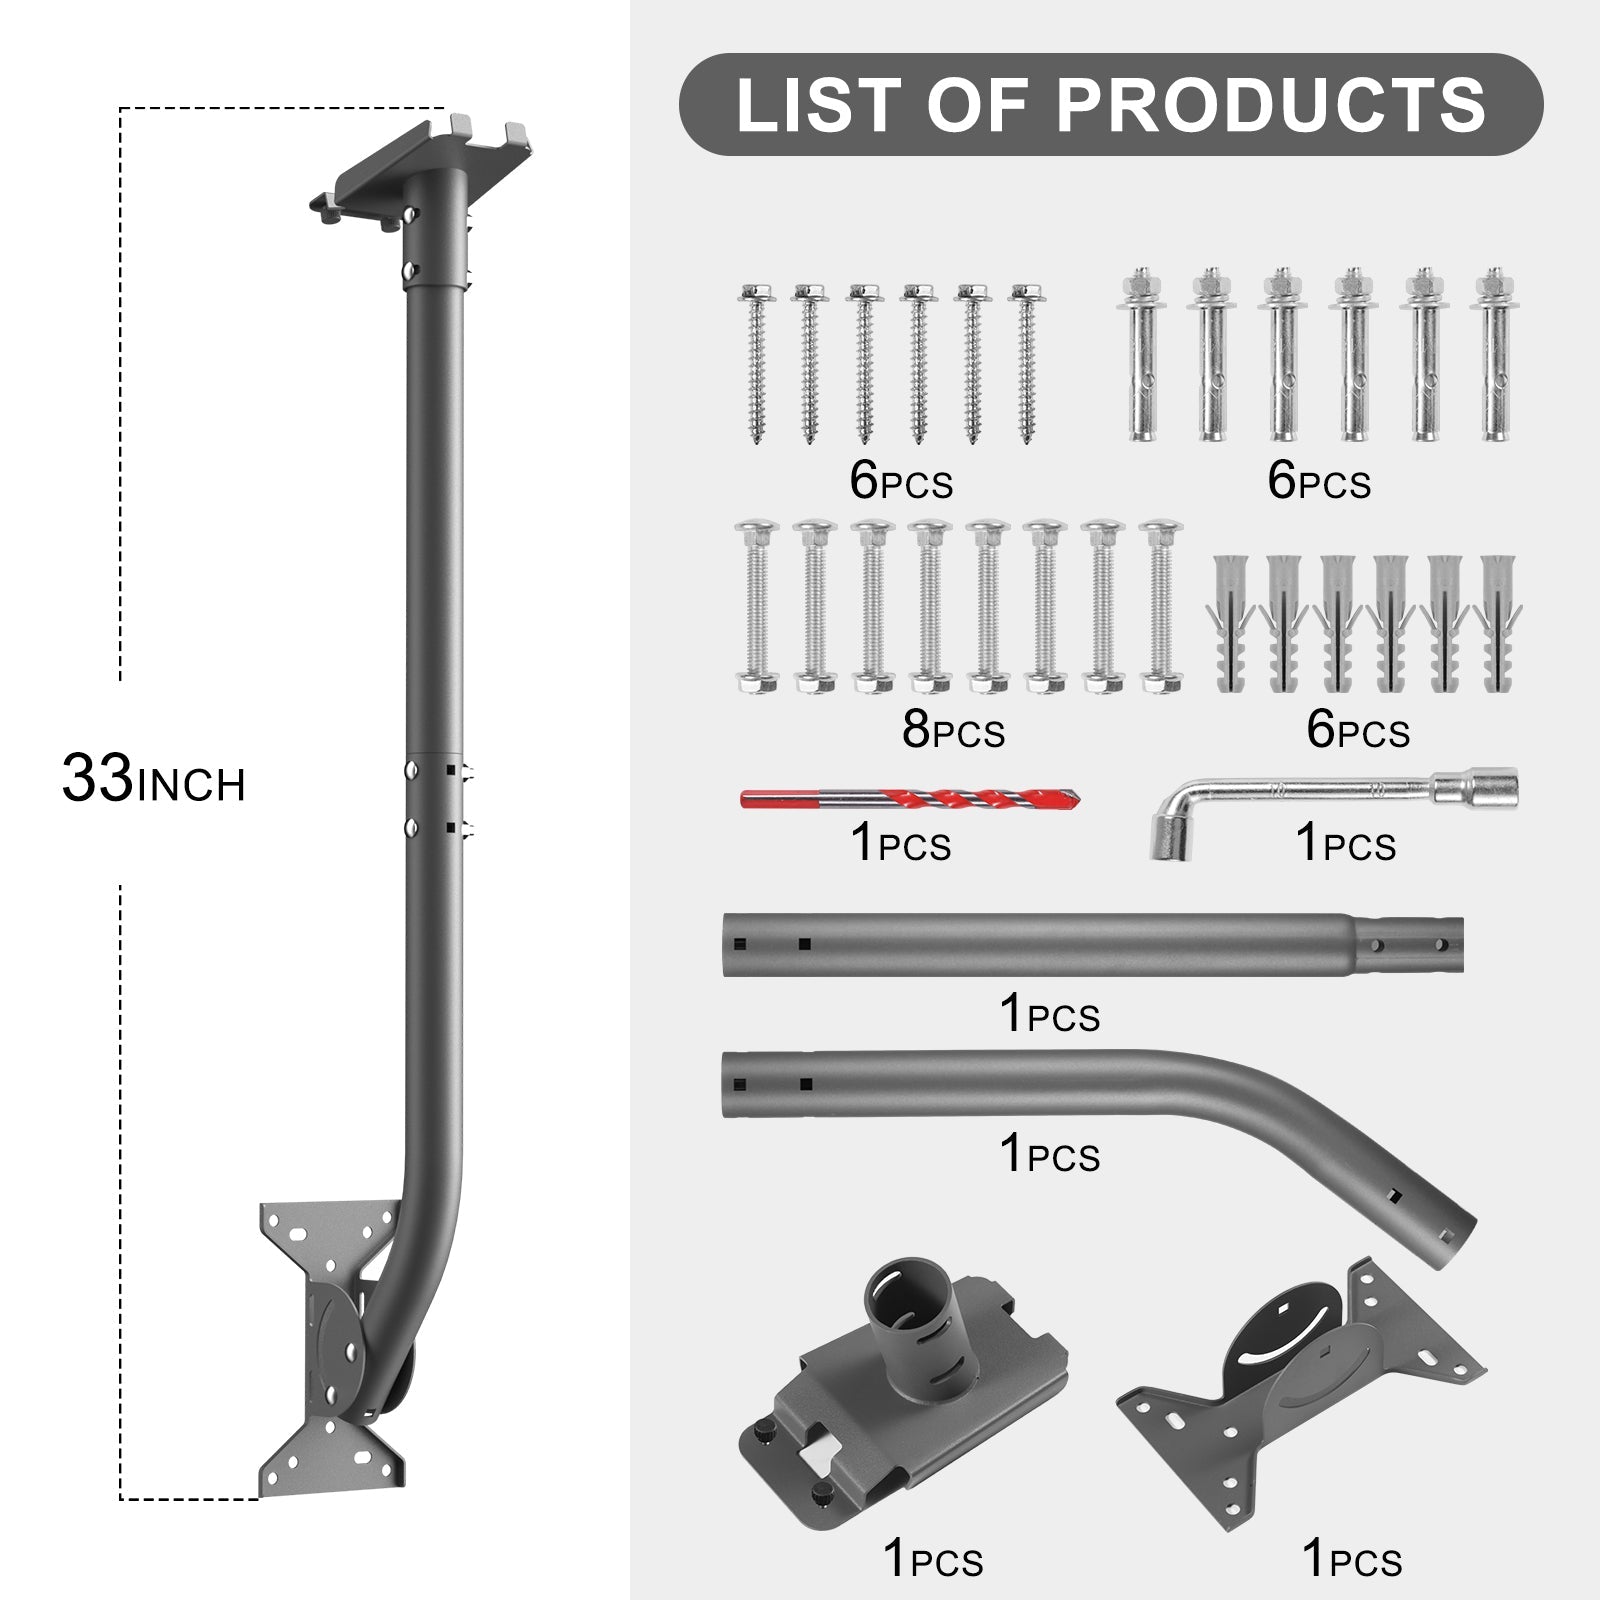
A mounting product needs to show exactly what customers receive. This product image clearly presents the 33-inch mount height and the included hardware pieces, helping reduce hesitation before checkout.
- Main Mount Structure: 33-inch raised bracket shown in product image.
- Tube Sections: Straight and angled tube pieces for wall/eave positioning.
- Mounting Plates: Wall/roof mounting plate and Starlink V5 connection bracket.
- Hardware: Screws, expansion bolts, anchors, drill bit and wrench shown in the kit image.
Where This Mount Works Best
This mount is best for customers who want a cleaner fixed Starlink V5 setup on a structure rather than a temporary ground stand.
- Exterior Walls: Good for garages, cabins, workshops and utility walls with solid backing.
- Eave / Roof Edge Areas: Helps raise the dish away from low roofline obstruction.
- Cabins & Rural Homes: Useful for long-term Starlink placement away from ground traffic.
- Remote Worksites: Helps create a fixed elevated internet setup for daily use.
Starlink V5 Compatibility Reminder
This product should be positioned as a Starlink V5 mount, not a Tesla vehicle fitment accessory. Customers should confirm their Starlink version and mounting interface before checkout.
- Product Type: Starlink V5 roof & wall mount kit
- SKU: XL0234
- Color: Gray
- Mount Style: Fixed roof / wall / eave mount
- Height Reference: Product image shows 33 inch mount height
- Not Universal: Do not order for Starlink Mini, Gen 2, Gen 3, Standard, High Performance or other versions unless the mounting interface is confirmed separately.
Installation Notes
Roof and wall mounting is more demanding than simple indoor accessories. For safety and long-term stability, professional installation is recommended, especially for roof edges, brick walls, high locations and windy areas.
- Step 1: Confirm the selected location has a clear sky view and solid structural backing.
- Step 2: Test-position the bracket and confirm cable routing before drilling.
- Step 3: Mark the mounting holes and choose hardware suitable for the wall or roof surface.
- Step 4: Drill carefully, install anchors or bolts, and secure the mounting plate.
- Step 5: Assemble the tube sections and Starlink V5 adapter bracket.
- Step 6: Adjust the angle, tighten all fasteners and check for movement.
- Step 7: Route the cable with drip loops and strain relief so water does not run directly into connectors.
Why Choose A Roof & Wall Mount?
| Scenario | Tesstudio Starlink V5 Mount | Temporary Ground Stand |
|---|---|---|
| Sky view | Raises the dish above many low obstructions | Can be blocked by cars, people, fences or outdoor gear |
| Installation style | Cleaner fixed roof / wall / eave setup | Temporary and more exposed on the ground |
| Angle positioning | Adjustable bracket helps fine-tune placement | Limited by stand position and ground level |
| Cable management | Easier to plan a fixed cable route along a wall or roof edge | Cables may cross walkways or outdoor activity areas |
| Best for | Homes, cabins, garages, workshops and fixed outdoor setups | Short-term camping or portable temporary use |
Outdoor Mounting Safety Notes
- Use A Load-Bearing Surface: Mount only to strong structural material, not decorative trim or weak siding.
- Weather Matters: Wind, snow, ice, heavy rain and storms can increase stress on outdoor mounts.
- Check Fasteners: Inspect screws, bolts and brackets regularly after weather changes.
- Plan Cable Routing: Avoid sharp edges, hot surfaces, pinch points and standing water.
- Professional Installation: Recommended for roof, high-wall, brick, masonry or complex exterior installations.
Built For Real Starlink V5 Outdoor Use
- Home Internet: Cleaner long-term Starlink placement for houses and garages.
- Cabins: Useful where ground-level placement is blocked by trees, decks or terrain.
- Workshops: Keeps the dish mounted higher and away from work traffic.
- Rural Properties: Better for fixed outdoor setups that need repeated daily reliability.
- RV Sites: Works for semi-fixed outdoor locations when mounted to a suitable structure.
Frequently Asked Questions
Which Starlink model is this mount designed for?
This listing is for Starlink V5. Do not order for Starlink Mini, Gen 2, Gen 3, Standard, High Performance or other versions unless the mounting interface is confirmed separately.
Can it be installed on both roof and wall?
Yes. The product is positioned as a roof and wall mount kit, with images showing exterior wall, eave and roof-edge installation scenarios.
What is the tilt adjustment range?
The product title says 30° tilt adjustment, but one image says “90° regulate.” Tesstudio should confirm the actual adjustment range and keep the same value across the title, images, description and FAQ.
How tall is the mount?
The product image shows a 33 inch height reference for the assembled mount structure.
What is included in the kit?
Product images show tube sections, mounting brackets, dish adapter bracket, screws, expansion hardware, drill bit and wrench. Final package contents should match the selected product listing.
Does installation require drilling?
Yes. Roof or wall installation requires drilling and secure fastening into a suitable load-bearing surface.
Can I install it myself?
DIY installation may be possible for experienced users, but professional installation is recommended for roof edges, high walls, brick, masonry, complex surfaces or windy locations.
Can it be mounted on siding or fascia only?
Do not mount only to weak siding, thin panels, loose fascia or decorative trim. It should be anchored into strong structural material that can support outdoor wind load.
Will it guarantee better Starlink signal?
No mount can guarantee better signal by itself. It can help place the dish higher and away from some obstructions, but Starlink performance still depends on sky visibility, location, obstructions and service conditions.
Is the Starlink dish included?
No. This product includes the Starlink V5 roof & wall mount kit only. Starlink dish, router, cable and other accessories are not included unless specifically stated.
Q&A
We provide assistance through email, live chat, and detailed installation guides. Additionally, we offer step-by-step tutorial videos featuring influencers to help you with the process.
We offer a one-year warranty (two years for some products).
Yes, the product can be removed after installation without affecting the original wiring harness of the vehicle.
We offer free returns and exchanges if there are any quality issues with the product upon receipt by the customer.

Subscribe
Join Us - Enjoy our latest news and exclusive discounts & gifts.