
Owner Brief: Opening a Tesla Model 3 Front Trunk With No Power
Owner Brief · Directly Readable Tesla DIY Guidance
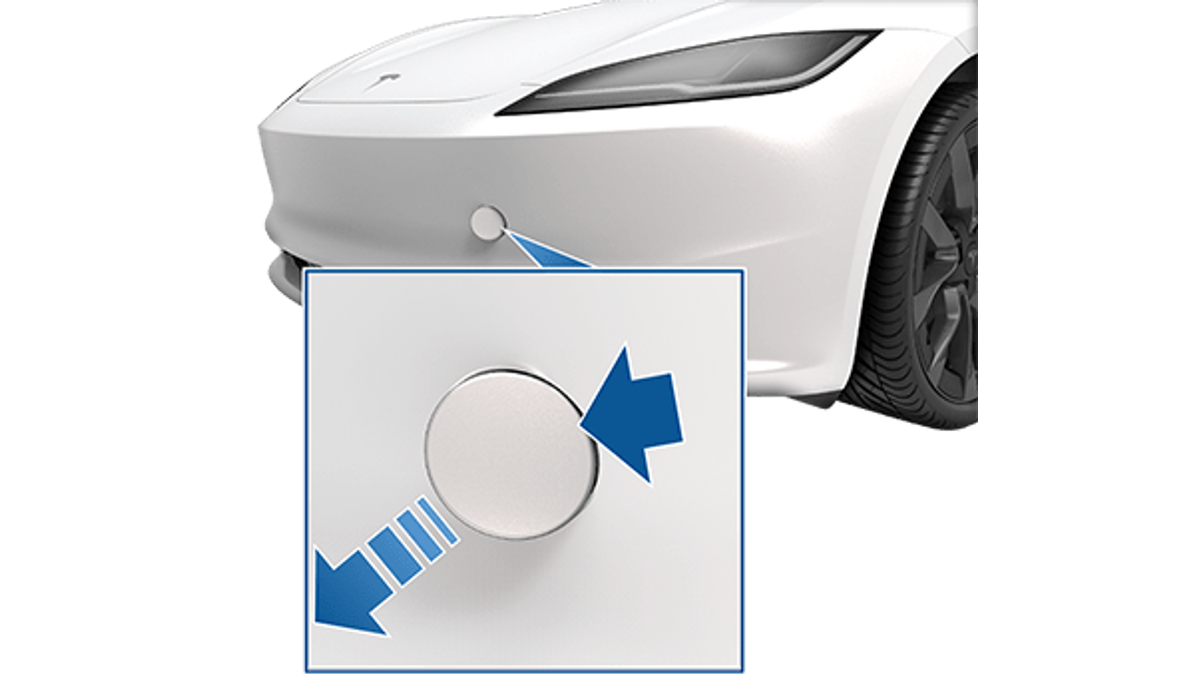
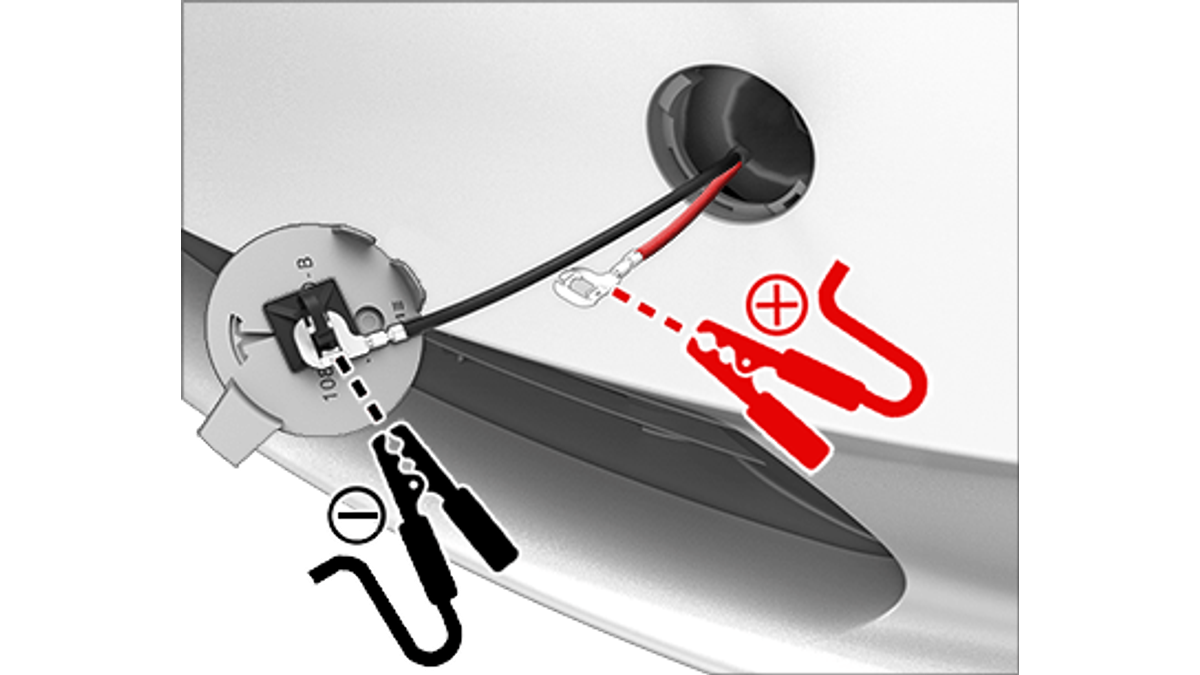
Tesla’s Model 3 no-power front-trunk procedure uses the red and black leads behind the front tow-eye cover to release the hood latches. It does not charge the low-voltage battery. Match red to red and black to black, remove the supply as soon as the hood opens, and never leave it connected for more than 30 seconds.
30-Second Brief
- This Owner Brief is dated October 11, 2026 in America/Los_Angeles. It summarizes current Tesla DIY guidance and is not a claim that the hardware changed today.
- The procedure is for a Model 3 with no low-voltage power; Tesla says it will not open a locked car that still has low-voltage power.
- Use the front tow-eye cover. Tesla says a rear tow-eye cover is for transport and does not contain the correct leads.
- Connect red positive to red positive and black negative to black negative.
- The terminals release the hood latches only; they do not charge the low-voltage battery.
- Disconnect as soon as the hood unlatches, never exceeding 30 seconds, and remove the black negative cable first.
What Happened
Tesla publishes an owner-accessible DIY procedure for opening the Model 3 hood when low-voltage power is unavailable. The value is not novelty but precision: it identifies the correct cover, the polarity, the limited function of the leads and the maximum connection time.
This brief enters Tesstudio’s mandatory fallback ladder after five complete no-publication hours while the Los Angeles daily count remains below four. Same-window items were already represented, future-only or below the evidence threshold, so the workflow expanded to useful current owner documentation without presenting it as breaking news.
What Is Confirmed
- Trigger condition: Tesla frames the procedure for the unlikely event that Model 3 has no low-voltage power.
- Locked-car boundary: the steps do not open the front trunk when the vehicle is locked and still has low-voltage power.
- Correct access point: use the front tow-eye cover; the rear cover is for transporting only.
- Polarity: red positive connects to red positive and black negative connects to black negative.
- Limited function: applying external power to these leads releases the hood latches and does not charge the low-voltage battery.
- Connection limit: remove the supply as soon as the hood unlatches and do not leave it connected for more than 30 seconds.
- Disconnect order: Tesla says to disconnect both cables beginning with the black negative cable.
- Jump-start boundary: Tesla’s separate guide says the actual jump-start procedure differs for lead-acid and lithium-ion low-voltage batteries and warns against short circuits.
What Remains Unconfirmed
The cited guidance does not diagnose why a particular Model 3 lost low-voltage power. Opening the hood is an access step, not proof that a battery, terminal, controller or other component has failed.
The page also does not authorize improvising with the rear tow point, reversing polarity, leaving the external supply attached or using Model 3 to jump another vehicle. Tesla explicitly says Model 3 cannot be used to jump-start another vehicle.
Why It Matters
Owners can easily confuse two separate operations: energizing external leads to release the hood and jump-starting the low-voltage system after gaining access. Tesla treats them as different procedures. Keeping that boundary clear reduces the chance of attaching a supply to the wrong place or assuming the front leads charge the battery.
The 30-second limit and disconnect order are also operational details that generic summaries often omit. They belong in the answer because they come directly from the manufacturer’s current DIY documentation.
What Tesla Owners Should Know
- Confirm the condition. This procedure is for no low-voltage power, not a shortcut into a normally powered locked vehicle.
- Use the front cover only. Tesla says the rear tow-eye location is for transporting and lacks the correct hood-release leads.
- Check polarity twice. Connect red positive first, then black negative, following the external supply manufacturer’s instructions.
- Stop when the latch releases. Disconnect immediately and never exceed 30 seconds.
- Remove black first. Follow Tesla’s stated disconnect order.
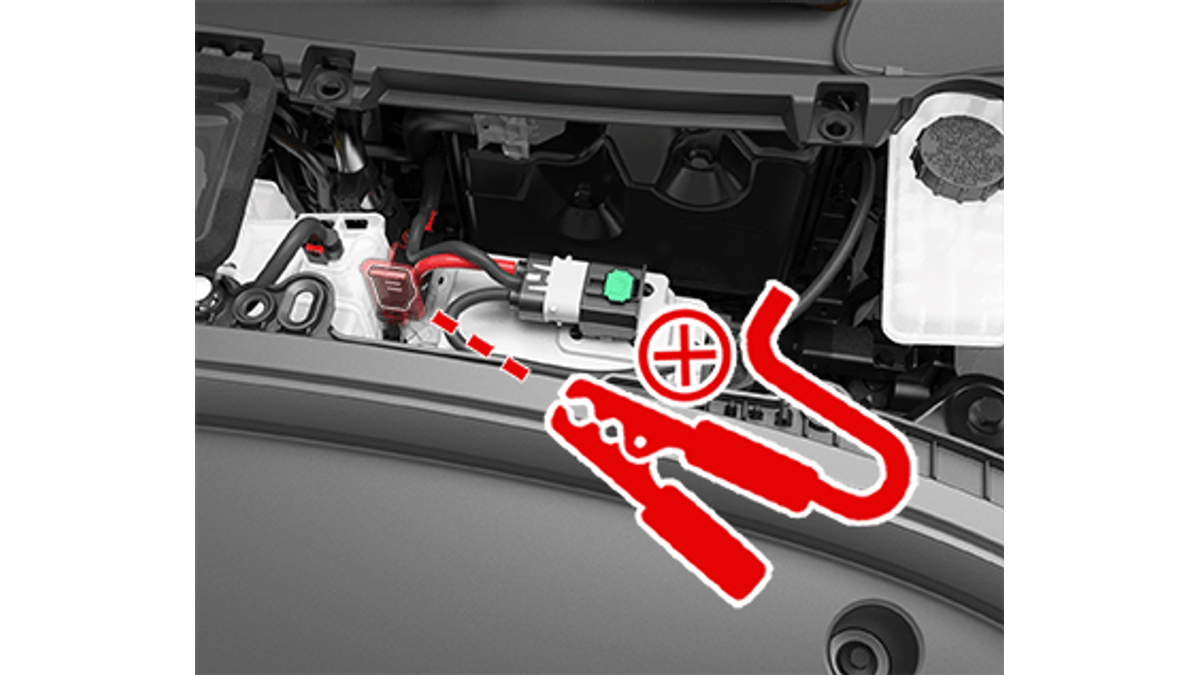
- Separate access from repair. If jump-starting is needed, identify the low-voltage battery type and follow Tesla’s separate matched procedure.
- Do not jump another car. Tesla warns that Model 3 cannot be used as the donor vehicle.
Tesstudio Analysis
This Owner Brief scores 72.8. Authority and factual confidence are high because two directly readable Tier 0 Tesla DIY pages define the procedure and its electrical boundaries. Event magnitude and timeliness are lower because this is standing owner guidance, not a newly announced vehicle change.
The most important distinction is functional: the bumper leads unlatch the hood; the under-hood procedure addresses the low-voltage system. Treating those as one operation would erase the exact boundary Tesla documents.
Related Tesla News Resources
For vehicle recovery and flatbed precautions, see Tesstudio’s Model 3 transport guide. For account and access preparation, see the Phone Key and backup key-card explainer. No Related Gear module is included because the evidence does not establish a specific accessory need.
Sources & Reporting Notes
- Tesla Model 3 DIY — Opening the Hood with No Power — primary instructions for access point, polarity, latch-only function, 30-second limit and disconnect order.
- Tesla Model 3 DIY — Jump Starting — primary boundary between hood access and the battery-type-specific jump-start procedure, including short-circuit and donor-vehicle warnings.
Reporting note: Both Tesla pages were read directly by the local verifier before publication. The two diagrams are Tesla manual assets fitted to 1200-by-675 canvases without factual alteration. Community posts were reviewed only as interest signals and are not used as evidence.
Update & Correction Log
October 11, 2026: Initial Owner Brief, published in mandatory sixth-hour fallback mode with the America/Los_Angeles daily count below four.



Hinterlasse einen Kommentar
Diese Website ist durch hCaptcha geschützt und es gelten die allgemeinen Geschäftsbedingungen und Datenschutzbestimmungen von hCaptcha.